
Framework agreements come in handy when buying/selling a complex deal. A definition of such agreements can be as follows:
An arrangement between one or several buyers and one or several suppliers.
This defines the terms that will govern the contract which is applicable for a defined period of time.
These agreements usually tend to define a various number aspects such as prices, amounts, delivery specifics, quality…
In Opencell, the framework agreement (Contract) are used to overload targeted prices of charges, for a specific level of the hierarchy which can be either the Seller, the Customer, Customer Account or Billing account (all levels of the Opencell hierrarchy except for the User Account), and a given duration.
Though it does not yet manage all aspects of a more traditional framework agreement, we have chosen to only reflect the part that is the most relevant based on our speciality → Prices
Let’s now see how contracts are created and managed in Opencell.
Contracts → Where to find them
Contracts are created and managed directly in the Customer Care app.
When you arrive on the Framework agreements list, you see the framework agreements of your environment, newest first. Disabled agreements are not listed. If your user account is limited to some customers, accounts or sellers, you see only the agreements linked to them.
The list shows the Code, Description, Status, Contract date and Creation date of each agreement. Statuses are shown in colour: Draft orange, Activated green, Closed red.
-
:filter: Filter and sort on each column, and choose and rearrange the columns, like in the other lists of the new portal (see List components behavior)
-
:plus: Create contract button to create a new framework agreement
-
:Download: Export table button → This downloads the list as an Excel (XLSX) file
The actions at the end of a line depend on the status of the agreement:
-
Activate: on a Draft agreement.
-
Duplicate: on every agreement.
-
Close: on a Draft or Activated agreement, after you confirm it in a dialog.
Creating a framework agreement
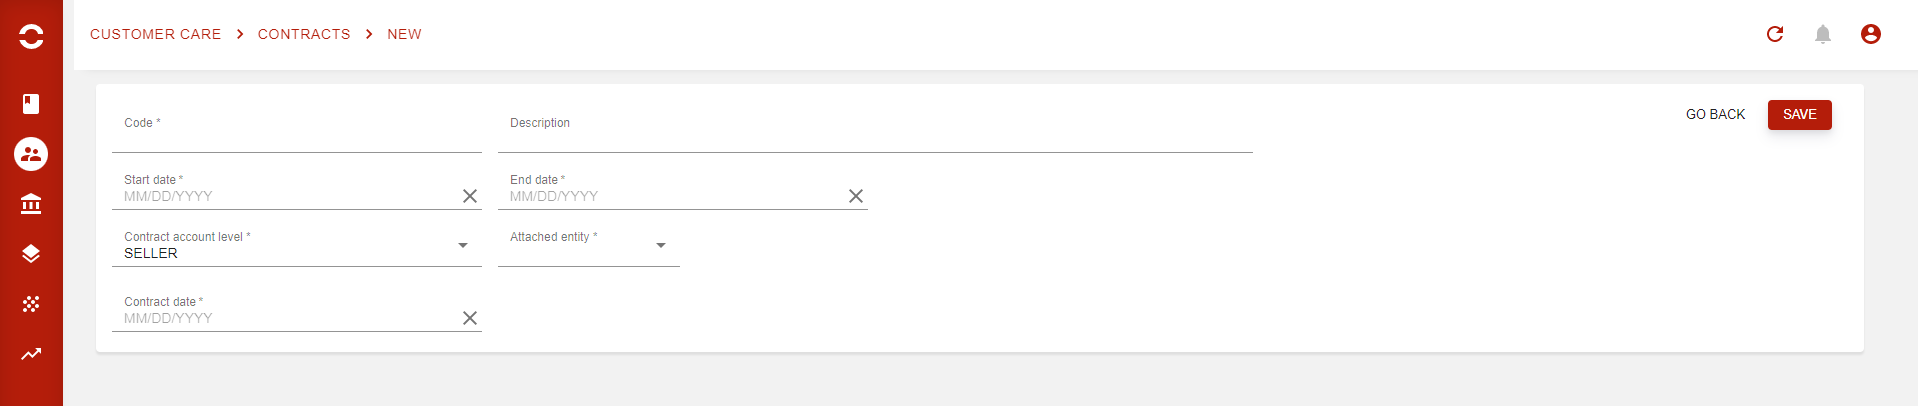
To create a contract, click :plus: Create contract on the list. Once done, you will arrive on the following page:
Generic section
This is the Generic part of your contract, where you will define global key information such as:
-
Code* → Contract internal code
-
Description → Contract internal description
-
Start date* → The contract’s first day of application
-
End date* → The contract’s last day of application (end date can be updated even if contract is already active
-
Contract account level* → To which level of the hierarchy will this contract be attached
-
Attached entity* → Once hierarchy level chosen, which entity will it be attached to
From 18.1.0 onwards, when the level is Subscription, the picker lists every subscription except the cancelled, terminated and closed ones, so you can attach the contract before the subscription is activated. Use the search box of the picker to find a subscription by its code or description, or by the code or description of its consumer.
-
Contract date* → The contract’s signature date (which is usually different from the start date
When all mandatory fields are filled, hit the SAVE button.
Discount lines section
You then see the updated page as below:
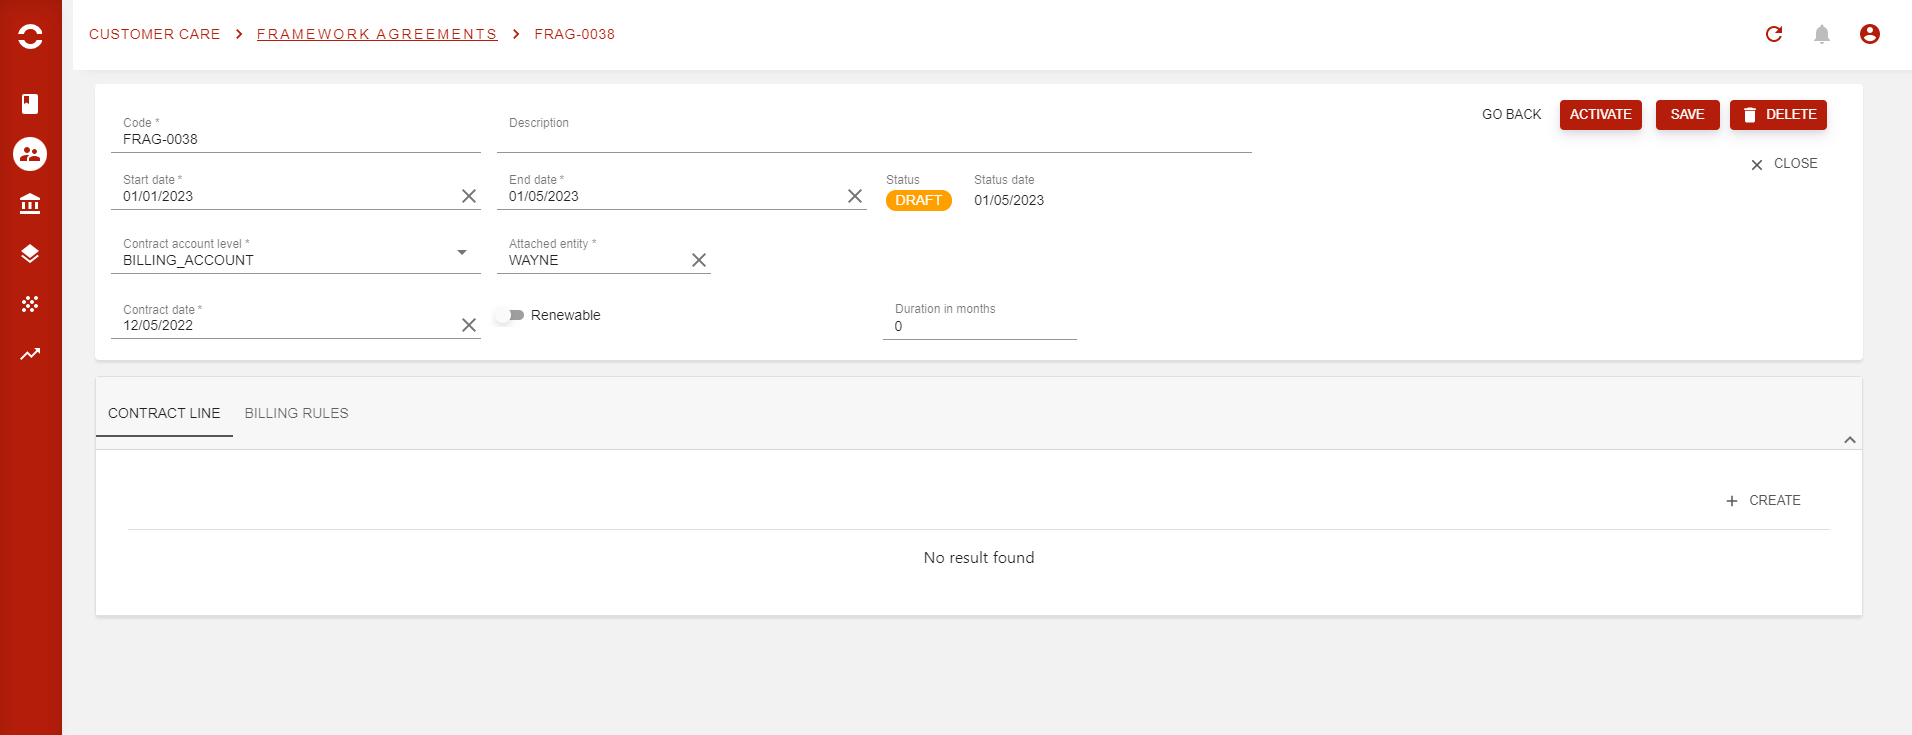
The contract has been properly saved as we now have its STATUS and the creation date. A few buttons are also available now that the contract has been created.
First, did you notice that two new options appeared in the Generic section:
-
Renewable
-
Duration in months
This option allows you to define if a contract can be renewed, and for how many months. Note that these two options are in read only once you have activated your Contract.
A new section has appeared, and this is where you will be able to manage the contract lines. Now what must be clear before going any further is that a framework agreement will override the prices for targeted charges, so that means the more charges you will have in your Contract, the more lines you will have to create and manage.
Contract line creation
Let’s start with the first tab of the second section, which is Contract line. There you will create and then see all lines related to the contract. So let’s jump right to it!
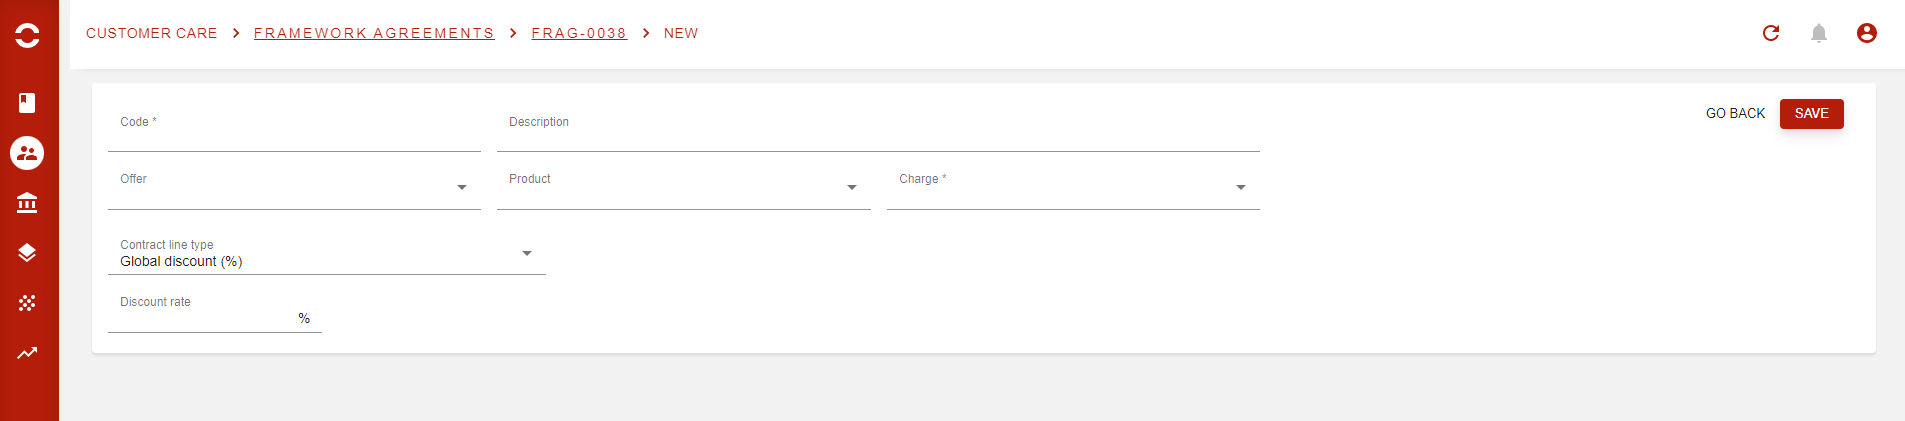
This is the page you arrive on after hitting the 'CREATE' button on the contract line tab.You may have noticed that this looks like what we have seen earlier on the Contracts management, whoch means we will have other sections/pages after this first step.
-
Code*
-
Description
-
Offer → Chose if you want your contract line to be dependent of the offer, and then to the targeted charge linked to this offer.
-
Product → Chose if you want your contract line to be dependent of the product, and then to the targeted charge linked to this offer. You can also combine Offer + Product to target even more a charge.
-
Charge* → Define the actual charge that will be impacted by this contract line.
-
Contract line type → Opencell now has 4 different line types. We will give examples for each of them.
-
Global price
-
Global discount ( % )
-
Custom contract price
-
Custom contract discount ( % )
-
-
Other fields after depend on the contract line type that is chosen above. This will be explained below.
For a Contract line, the Charge is always mandatory as it is the object that represents the pricing. However, using the Product and/or the Offer fields can allow you to add granularity to the contract line application.
Since the layout of the page changes based on the Contract lien type, we will now go into more details for the four of them.
Global price
When selecting this type, you will then be able to define the numerical price that you will apply for your charge, as below:
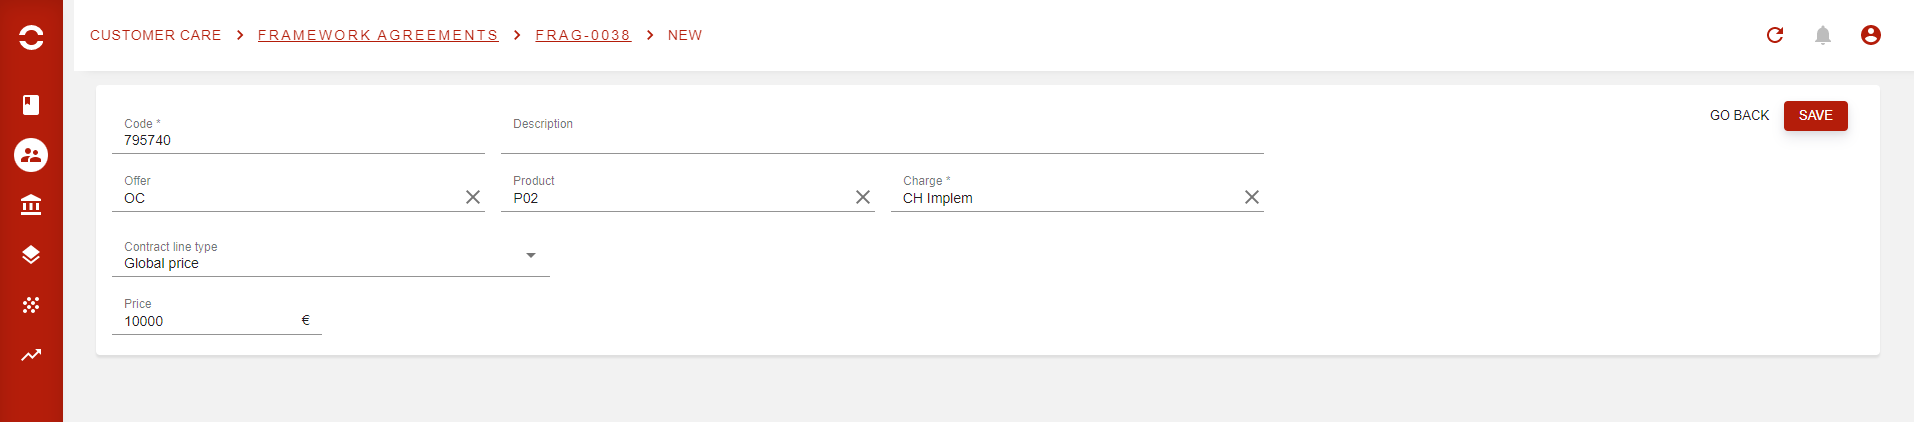
This can be done for any charge type, even those who have a price matrix! So in our example, whenever the customer Wayne (check generic section) will have the OC offer, with product P02, then the price of the CH Implem charge will be of 10 000€.
It is possible to add any discount types when user creates either the quote, or the order s-he will be able to add the discounts, as usual 😉
When done, save and go back to create other lines or activate your Contract.
Global discount ( % )
This type defines the percentage discount that will be applied to the all the targeted charge’s prices.

This again means that this can be used for price versions with and without grids.
When done, save and go back to create other lines or activate your Contract.
You will notice additional options:
-
Generate separate discount line
By default, the contracted unit price is the result of the discount application.
But sometimes, you’ll want to see the discount as a separate rated item, especially if you want to apply different article mapping and/or accounting accounts to the discount and the charge. -
Apply on overridden price
If unset, prices manually entered on quotes will not benefit from the discount.
Custom contract price
The custom prices for contract lines are a new way to define the charge’s tariffs. The logic is slightly different from what we have seen so far. These types will allow you to build more complex FrAg lines, based on price grids. So both Custom types will either allow you to duplicate a Price version that is a grid (Matrix=True), or to create a new one from scratch. You will then be able to create a whole new matrix for your targeted charge.
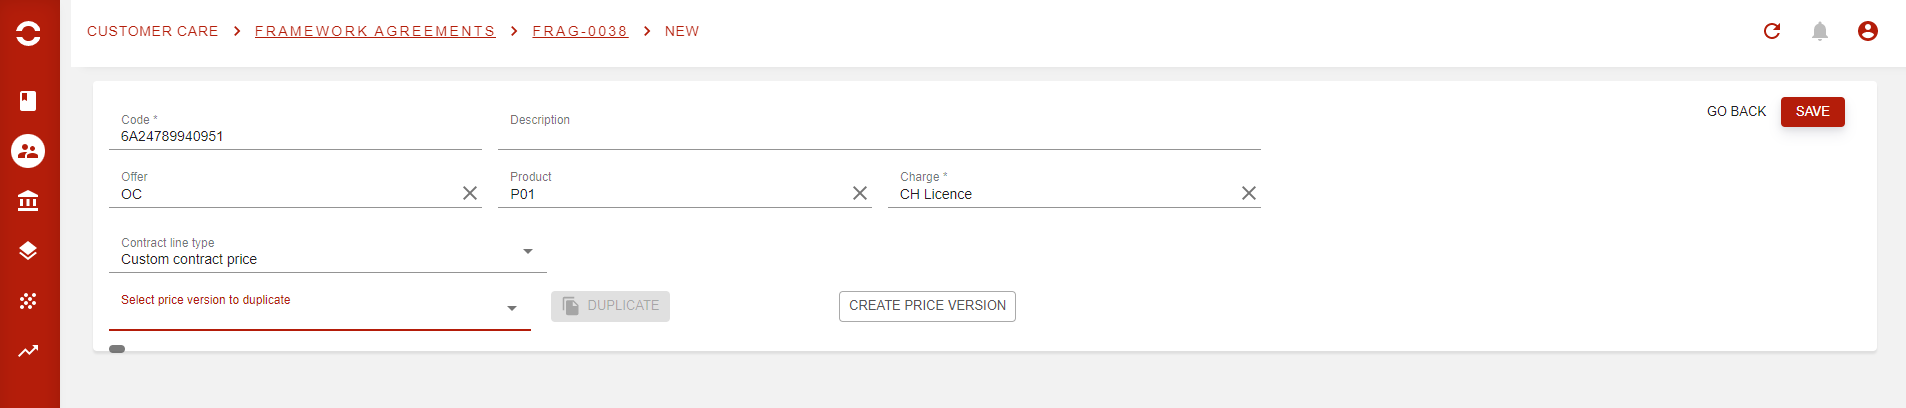
As you can see above, after selecting the Custom contract type, the system then gives you two options:
-
Select a price version to duplicate → Only matrix Price versions are visible here
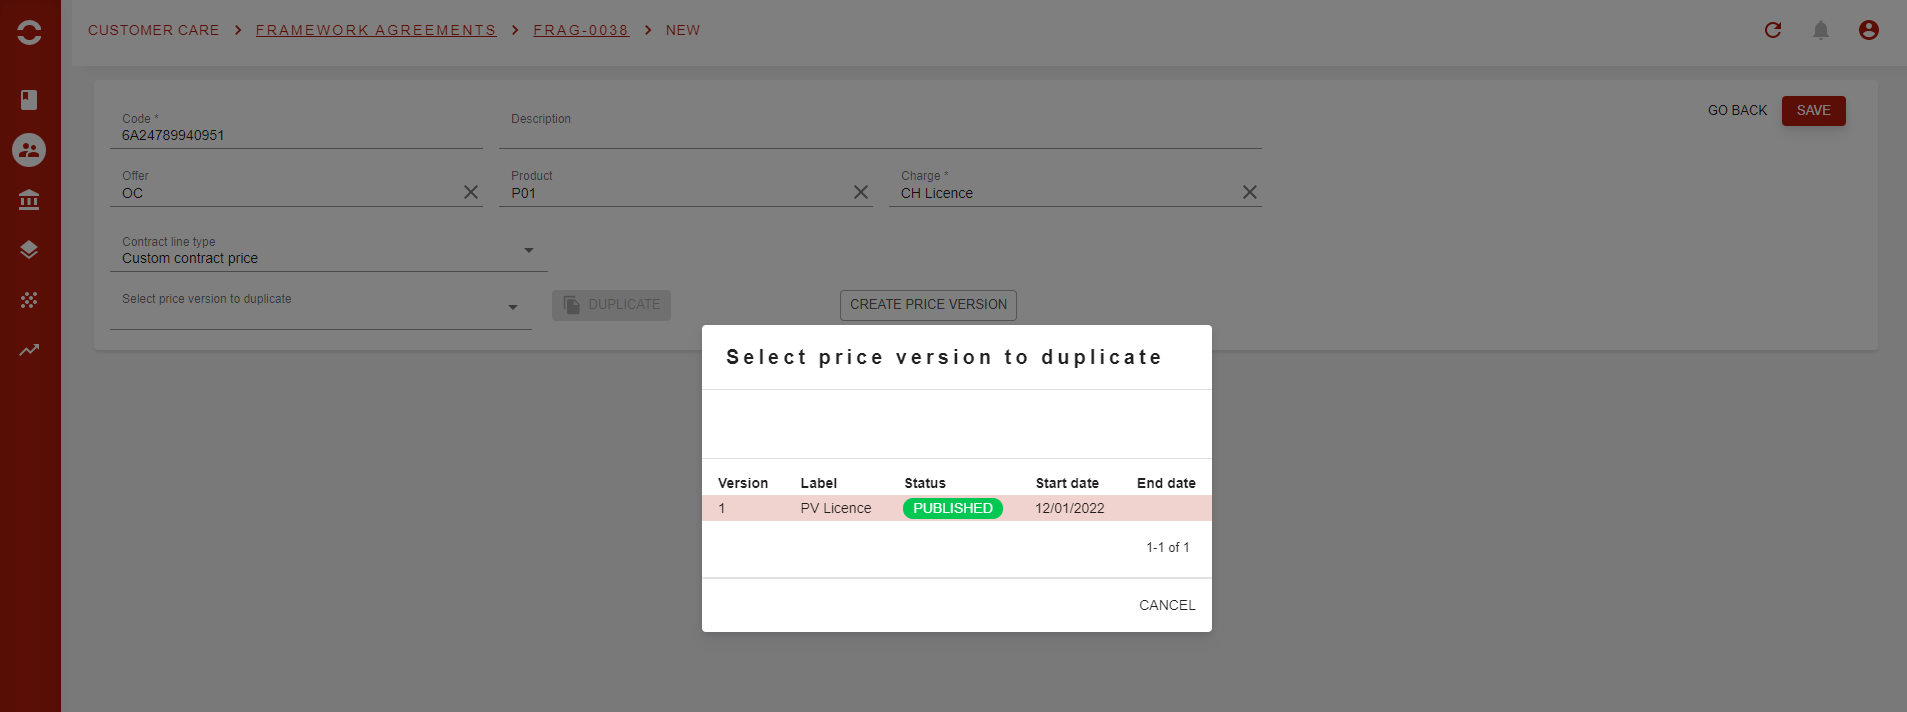
Pop-up with eligible PVs appears

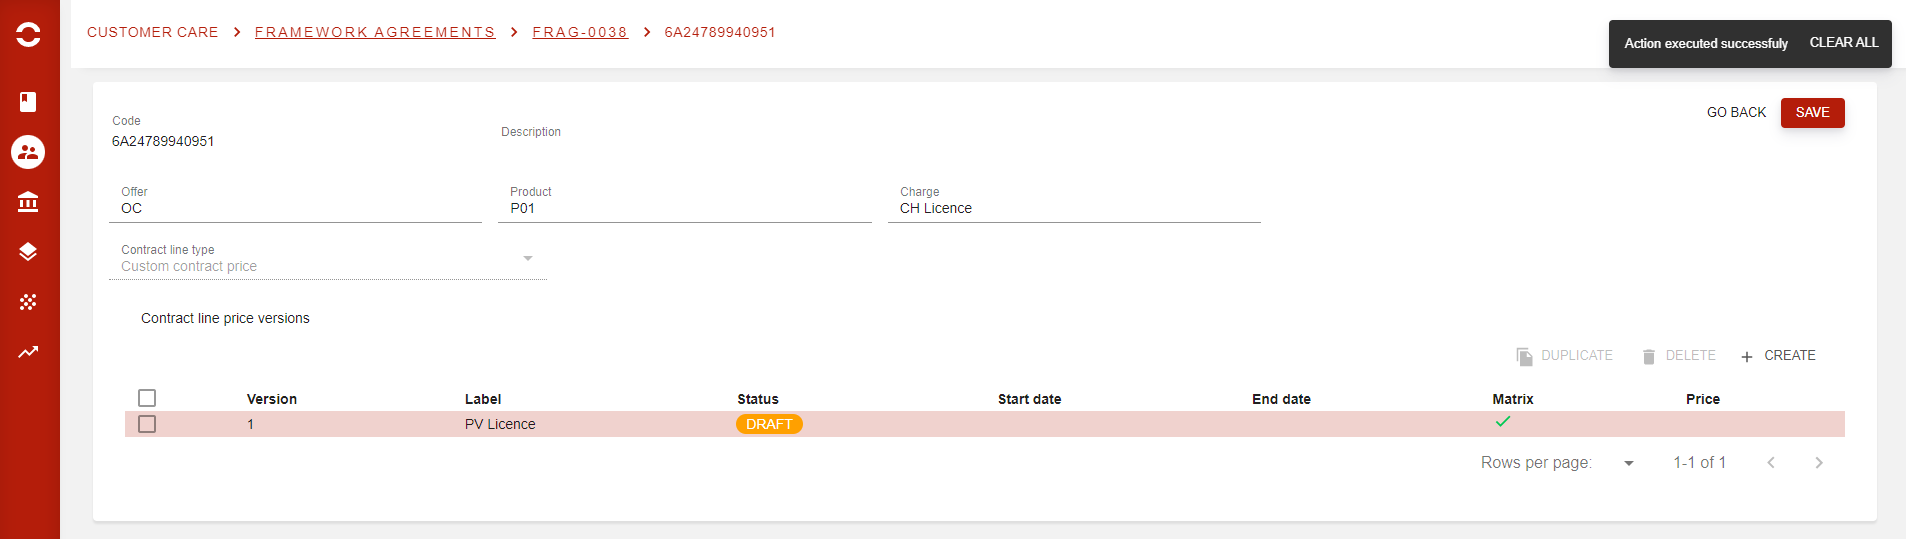
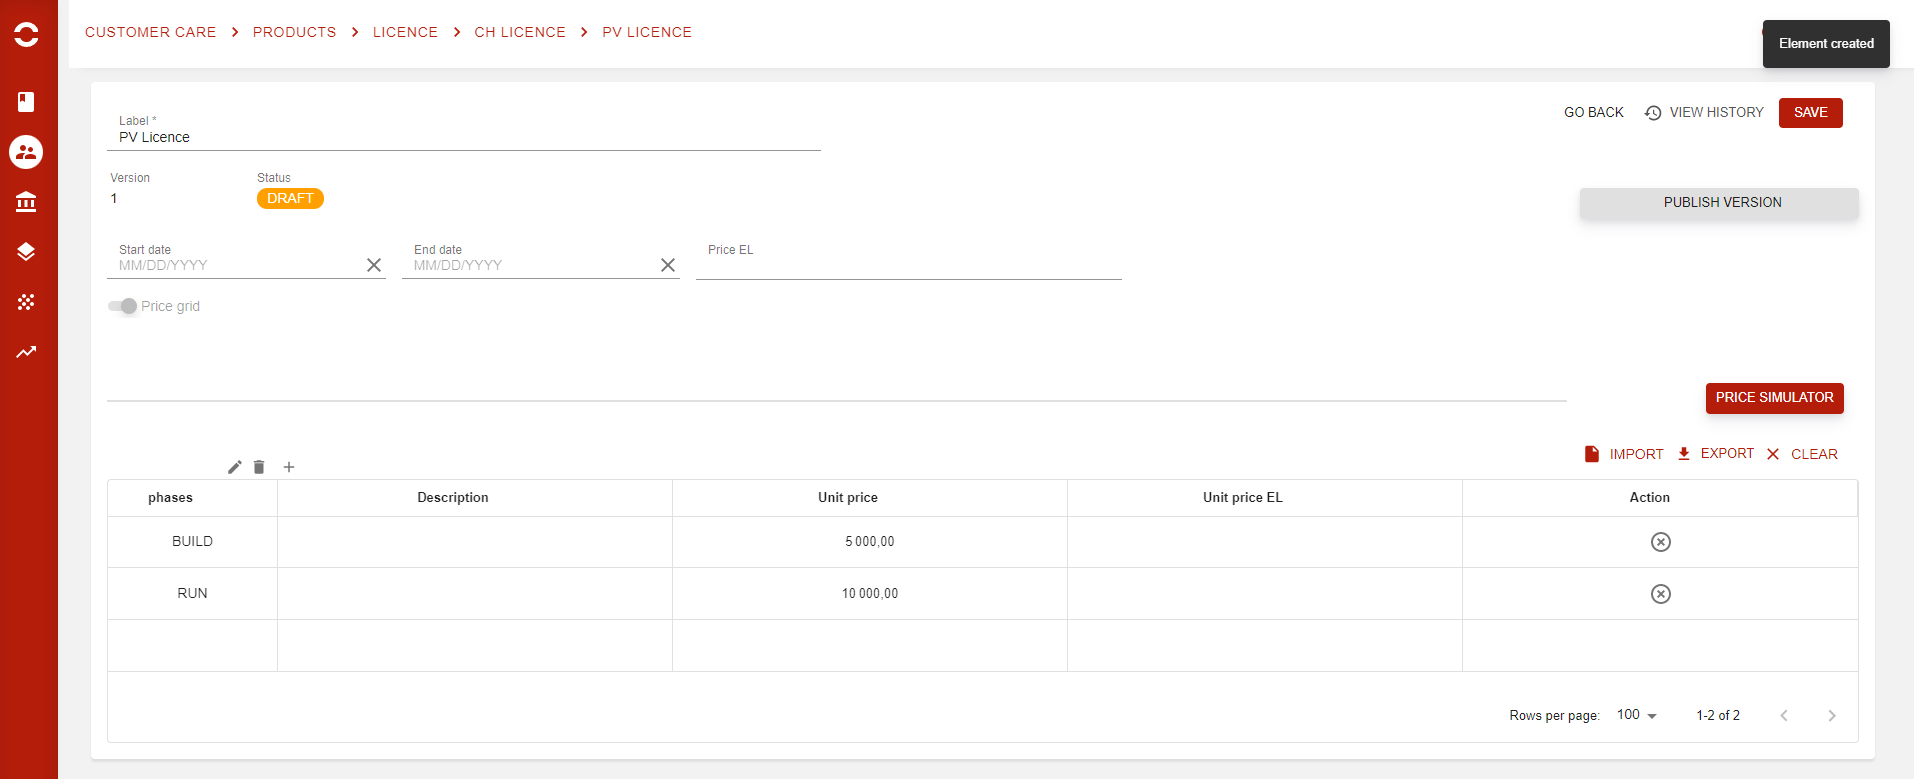
As for regular charge creation, you will be able to add Business attributes to your grid, but not new Custom attributes.
As the type selected here is Custom contract price, you define the numerical price for targeted lines. If some lines of the grid to not interest you, or are not impacted by the FrAg, then you can simply delete the lines. Same logic stands for lines that do not exist perhaps in the regular Price Version, you can create new combinations.
Once you are all done with your Price version, you can save and Publish it.
Price indexation
When price indexation is enabled, a Custom contract price line has an Indexation tab that groups its indexation settings:
-
Indexation formula → the formula used to index the prices of this line.
-
Last index value date → the target index value date used the last time this line was indexed, shown as YYYY-MM-DD. Until the line has been indexed once, the field shows the contract's reference index value date. Each time an indexation run indexes the line successfully, the date is updated with the target index value date of that run. Opencell uses it to know whether the value of an index of the formula has changed since, and so whether the line needs to be indexed again. Hover the info icon next to the field for a reminder.
-
Reference index dates → one row per index of the formula, with the Index (code and label) and an optional Reference index value date.
Leave the date of an index empty and that index is indexed as before, with the settings of the contract. Enter a date and, for that index only, it replaces the contract's reference index value date wherever the line's indexation formula uses that date; the other indexes keep the contract's date. This lets each index start from the base period agreed for it.
If you change the formula, the grid lists the indexes of the new formula. The dates of the indexes that are still in the formula are kept; the others are removed when you save the line.
You can also choose a different indexation formula for individual lines of the price grid: see Price grid management.
Custom contract discount ( % )
This type works exactly as the Custom contract price, and the difference is that prices are defined via a percentage (and not a numerical value).
Custom discount contract line also features the same discount specific options as the global discount contract line (generate separate discount line, apply on overridden price)
In our example, we have followed the same steps as for Custom contract prices
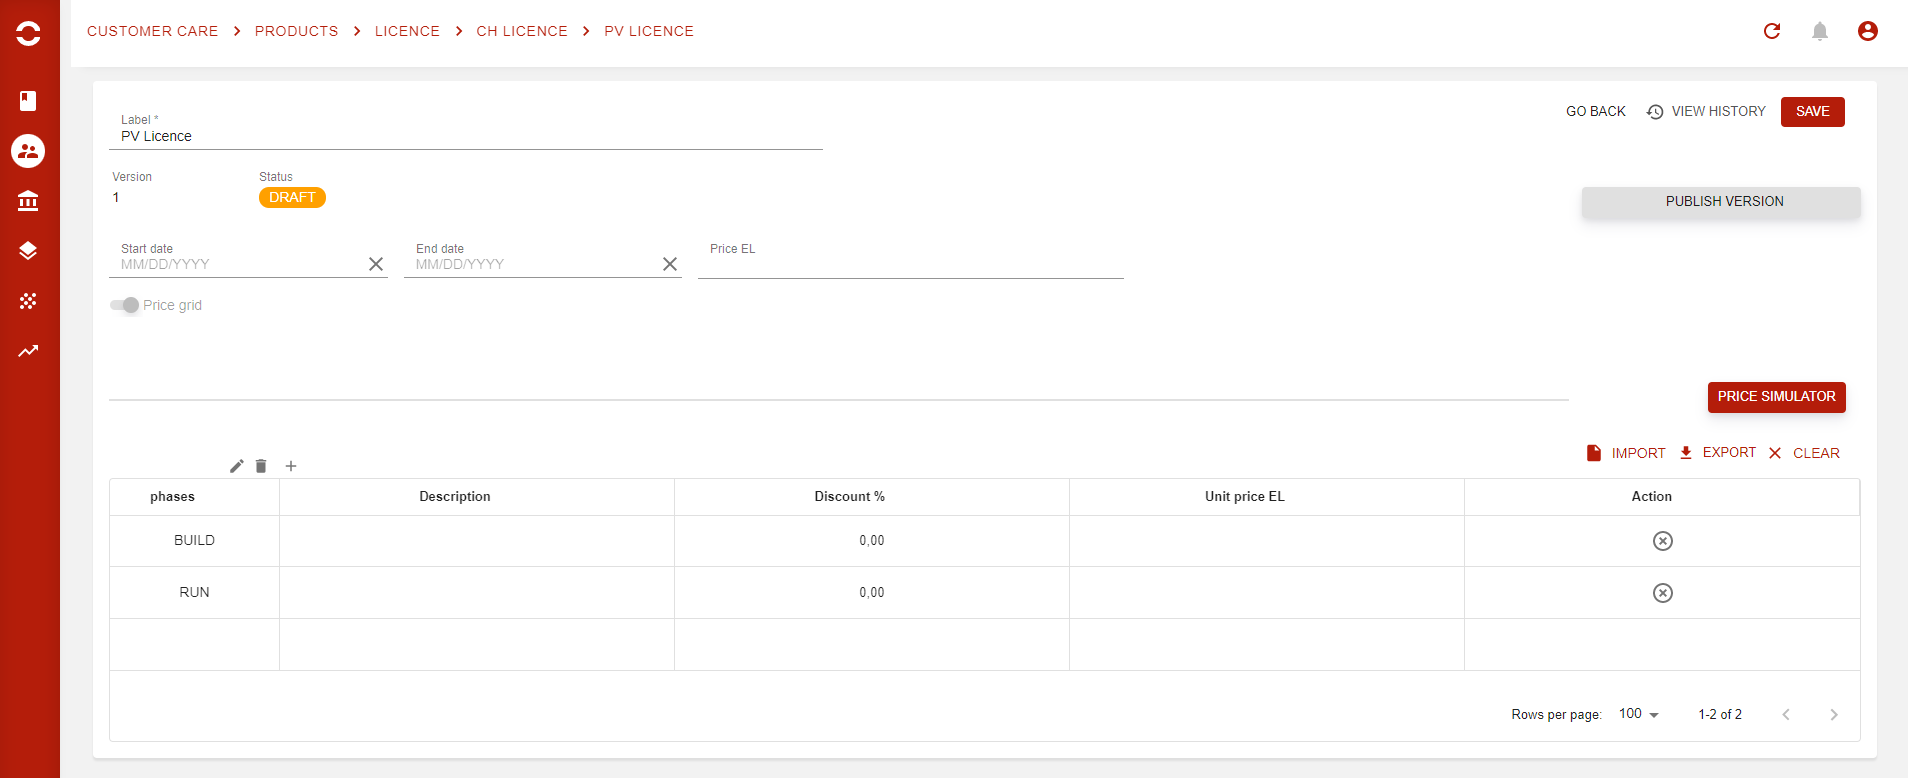
From here, you will not have a price per line, but the percentage (positive or negative) that you want to apply to each line.
It is possible here to create new combination, delete lines, and add business attributes to the grid.
Let’s not forget that for Custom types, you can create from scratch you own grid, as below:
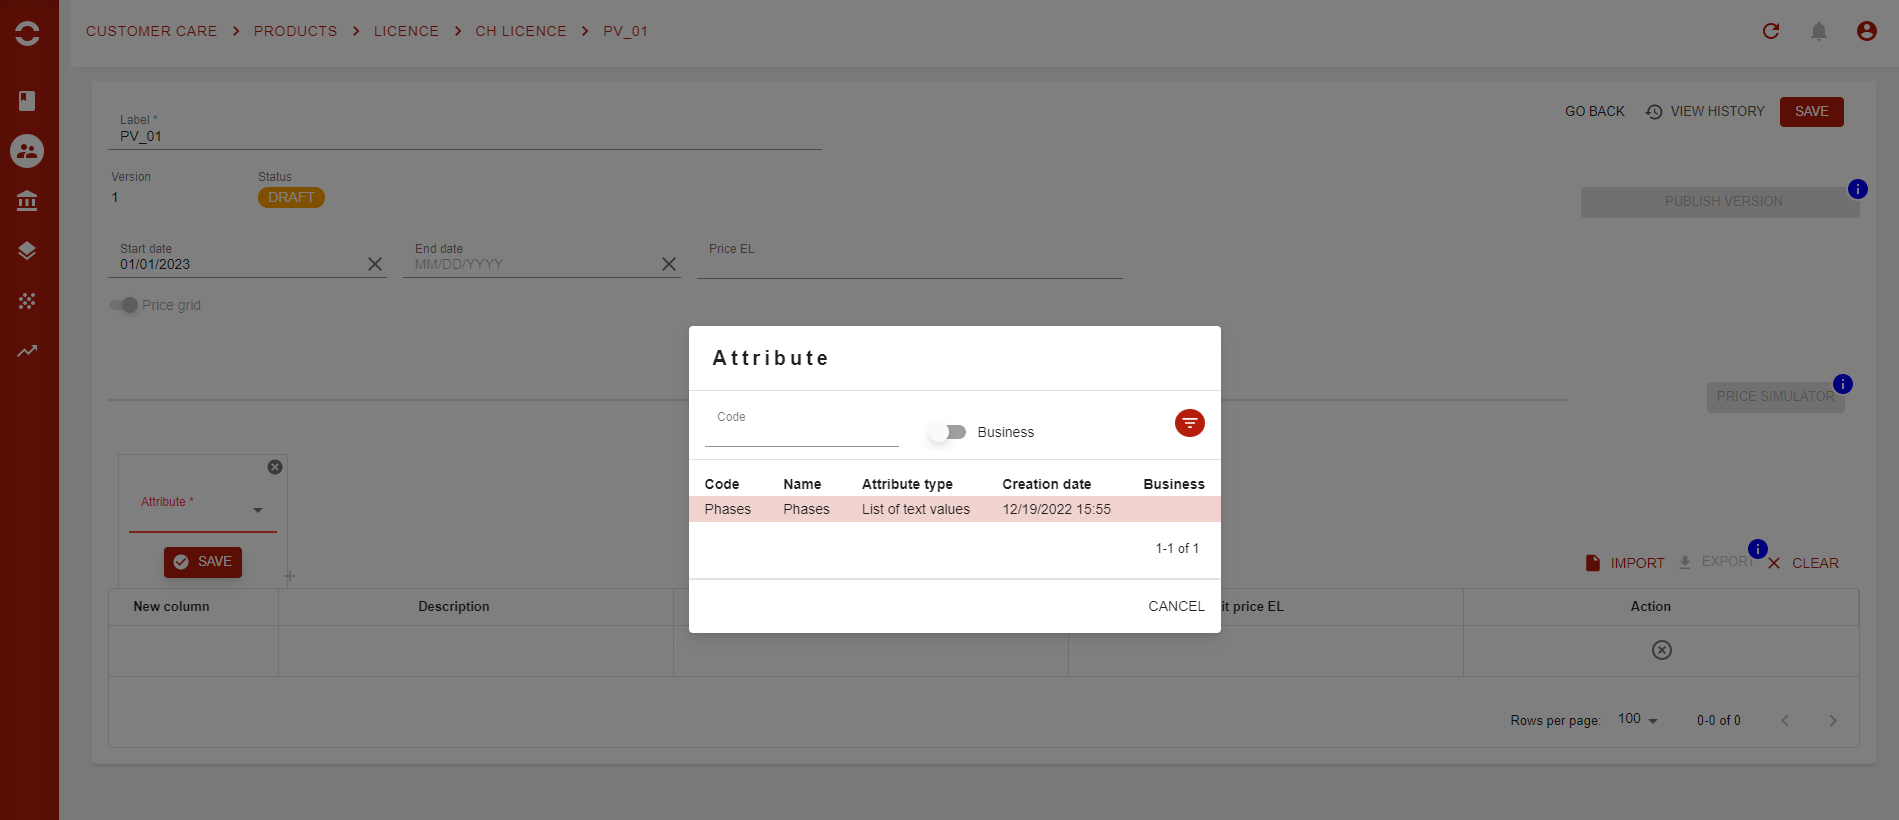
Billing Rules tab
This is a great option when you have complex model between Billing accounts (BA) of the Opencell hierarchy.
-
Criteria EL → Define criterion to target rated transactions that you wan to move from one BA to another
-
Invoiced billing account EL → Define the BA that will receive the rated transactions
This feature is pretty advanced and is hidden by default.
You can activate it on the feature management page.
To show the tab, check Enable contract level redirection rules on the Features management page of the general settings.
The tab holds a Redirection rules section that lists the rules of the contract. As the note above the list recalls, rules are evaluated from the first to the last, and only the first rule that matches a rated item is used.
-
# → the place of the rule in the evaluation order. You cannot type it: use the move actions to reorder the rules.
-
To add a rule, fill in the empty line always shown at the bottom of the list.
-
The move up and move down actions of a line move the rule one place up or down.
-
The delete action of a line removes the rule.
Both expressions are mandatory. In both of them, the rated item being tested is available as rt: hover over a column header for a reminder. Your changes are kept only when you click SAVE.
When a rated item is created, it is tested against the rules of one contract only: the first contract with redirection rules found from the subscription up to the seller. If a rule matches, the rated item moves to the billing account returned by the rule and is invoiced with that billing account; the billing account it came from is kept on the rated item. If a rule cannot be evaluated, or returns a billing account that does not exist, the rated item is rejected and its reject reason explains why. Manual invoices are never redirected.
Where to find Contracts?
As e have seen at the beginning of this page, you can apply a contract to almost any level of the hierarchy. However, since the complete hierarchy is not visible through the portal, how to know if contracts can impact Billing Accounts (BA)? We have added a new filter on the Customer 360 view which allows you to see all Contracts that can have an impact on the BA (Customer on the portal).
Selecting a shared contract on quotes, orders and subscriptions
On a quote version, an order or a subscription, the framework agreement picker normally lists only the active contracts attached to the customer's own hierarchy: the subscription, the billing account, the customer account, the customer and the seller.
Your administrator can allow any contract to be selected. The picker then lists all active contracts, whatever they are attached to, and its search works as usual. This lets you share contracts between customers: attach them to a dedicated seller that has no customers, for example Shared contracts, and select them wherever they apply. A contract selected on a quote is passed on to the order, then to the subscription.