This is an important part of the A/R processes. Matching account operations with one another allows you to have a clear view between Credit and Debit operations of different types.
Today, even the best accounting solutions must allow you to do manual reconciliation as the system does not have a better view as you or your accountants. This is why, alongside our new A/R processes we have added the manual matching functionality.
Manual matching: what is it?
Now before going further here, reconciliation’s goal is to ensure th matching between internal records and statements from external sources such as credit card company, a bank… In other words, I want to match an invoice with a payment.
Let’s give an example of a what is actually matching:
Say you have sold 2 hours of consulting for 500€. You will then have a Debit account operation for that sum. This is because you have an invoice that will have triggered the creation of that Account operation (AO). Here I have an invoice n° and the name of my customer.
When your customer pays you, and receive your bank statement (say it was a wire transfer, that you upload on your system), then you will also have a Credit account operation, for 500€. that AO is created from the upload of your bank statement. Here we have no reference with payment, and no clear name from the issuer
Now you have:
-
Debit AO (DAO) for invoice n° 73523 to HDY.LLC→ 500€
-
Credit AO (CAO) from Mr Zeng and no reference to invoice → 500€
No actual link exists between these two lines, and to change that we now use manual matching, which will match/reconcile both lines 🙂
Manual matching in Opencell
The example above is an easy example of matching. Easy because amounts are identical, and we only have two lines. But imagine if:
-
You had millions of lines
-
0 references
-
No customer identified
-
😱
As you may know, these cases do happen (not as extreme), and this is where highly time consuming tasks kick in.
To help you and your colleagues to manage this as easily as possible, we have deigned a specific matching solution that helps you identify AOs that are either linked to a same identified customer, or manually allocate a CAO to a customer, match one or several AOs to each other…
Manual matching tables
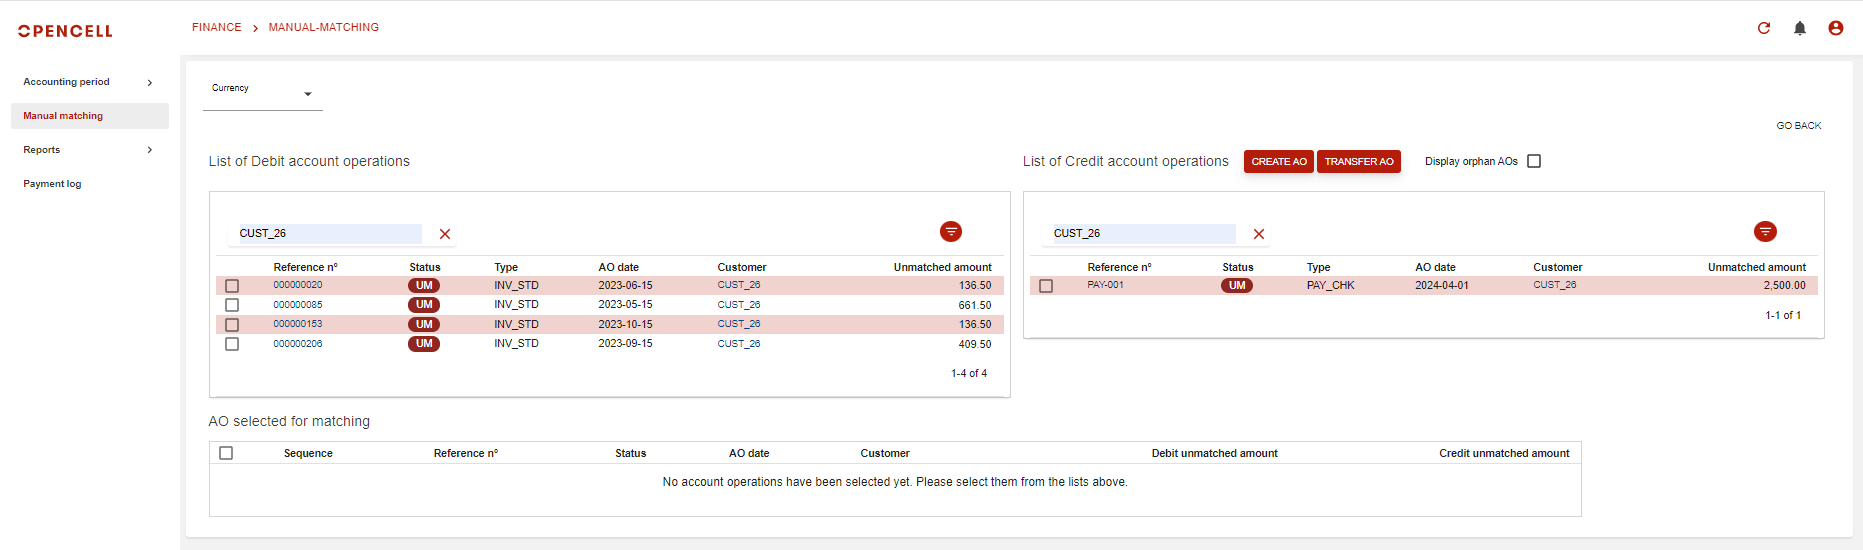
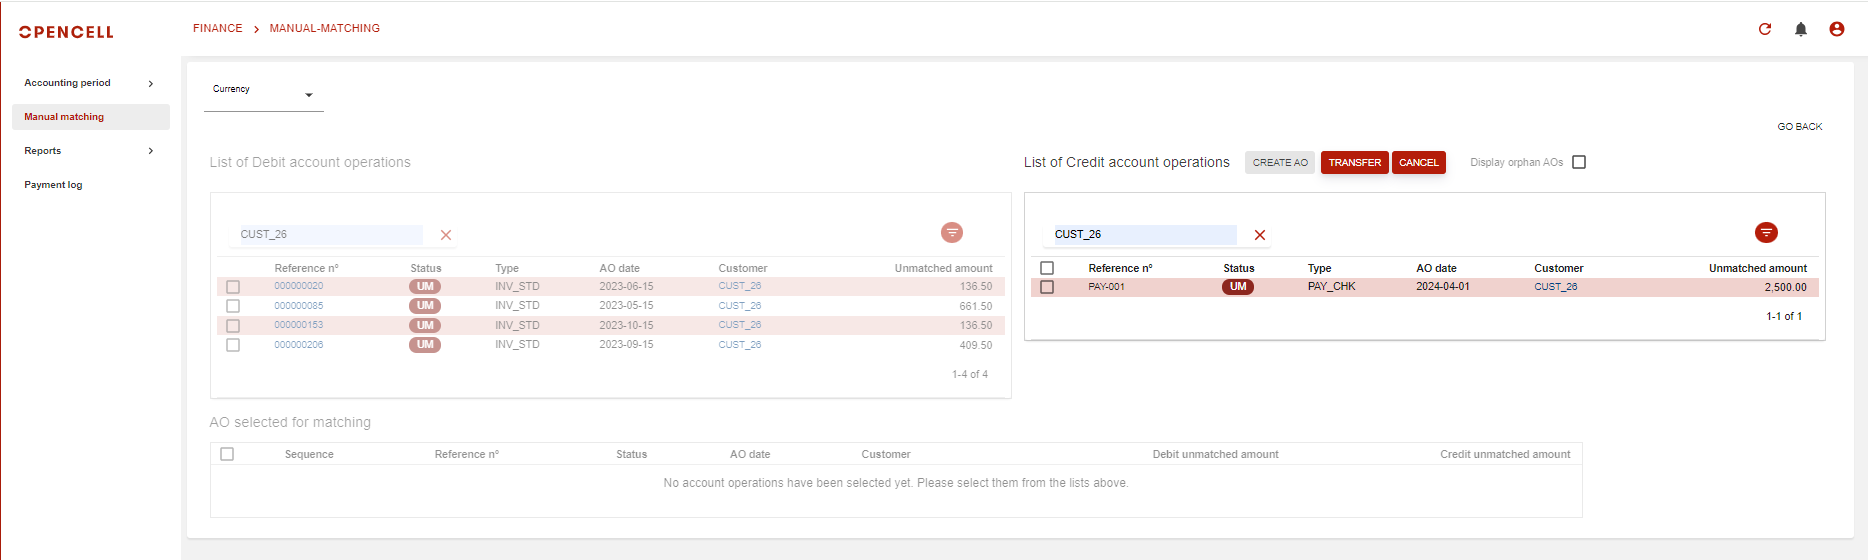
To access Manual matching feature, you will have to go on the Finance app, and select sub-menu “Manual matching”. You will then arrive on the following page:
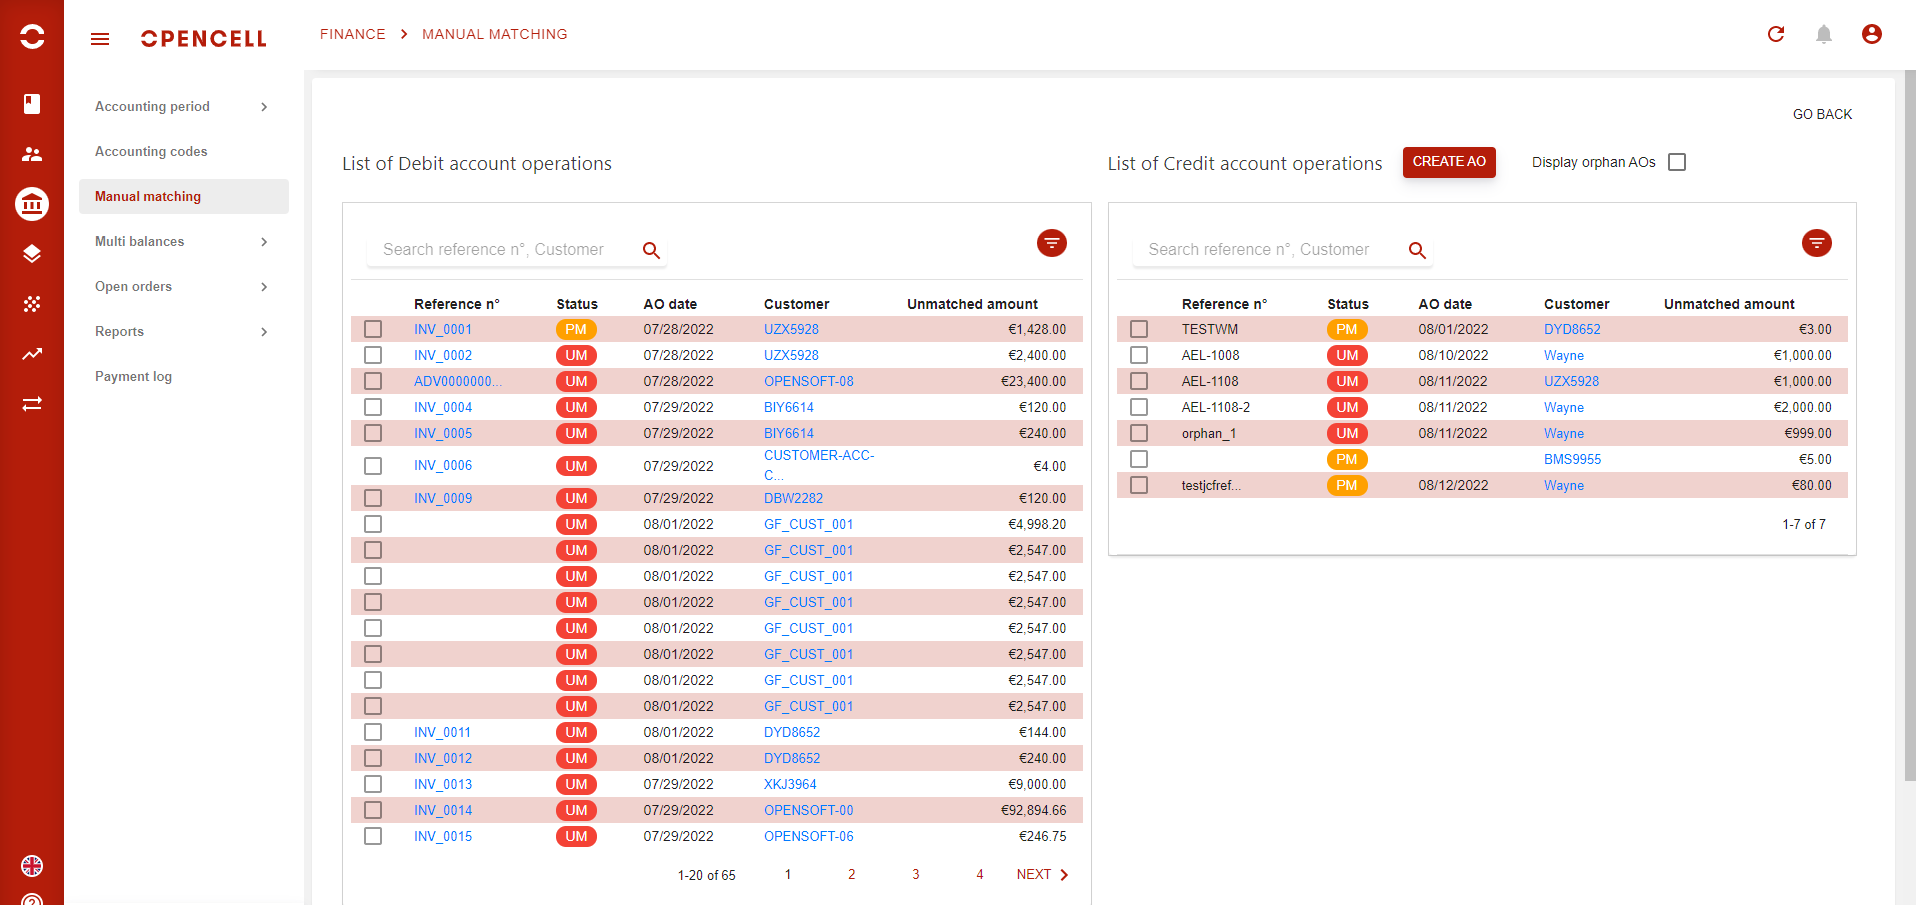
As you can see, when you arrive on this page you will distinguish two tables, the one on the left side lists all unmatched Debit account operations, and the one on the right side lists all unmatched Credit account operations.
Now for both tables, you will be able to:
-
Use a search bar ans seamlessly search for AO’s reference n° or linked Customers
-
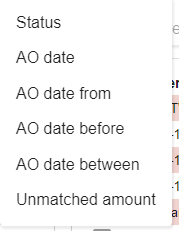
Use filters via the :filter: button, and apply the following options
-
Navigate in the different pages of listed unmatched AOs.
You may have noticed that you have a couple more options up-above the Credit AOs table.
First you have a button labeled ‘CREATE AO’. This button allows users with appropriate access rights to create a new Credit AO. This is usually meant to manually add payments. When hitting the button, users will the see appear a pop-up.
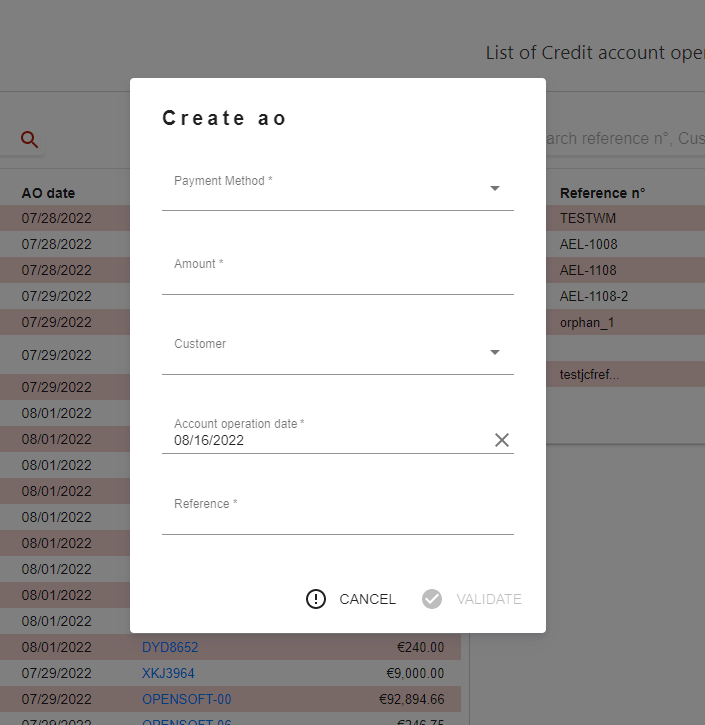
Users will then have to input all mandatory information and then validate or cancel the AO creation.
Note that the “Customer” field is not mandatory. this is to allow users to create Orphan Credit Account Operations via the portal. Check below to get more information 😉
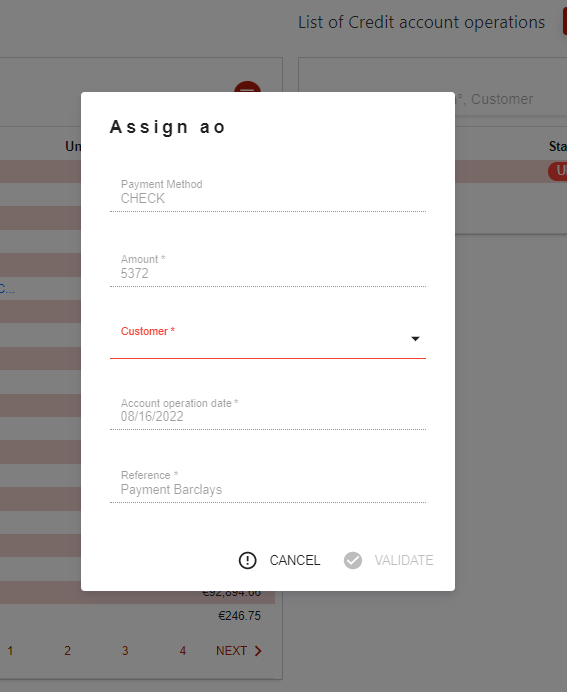
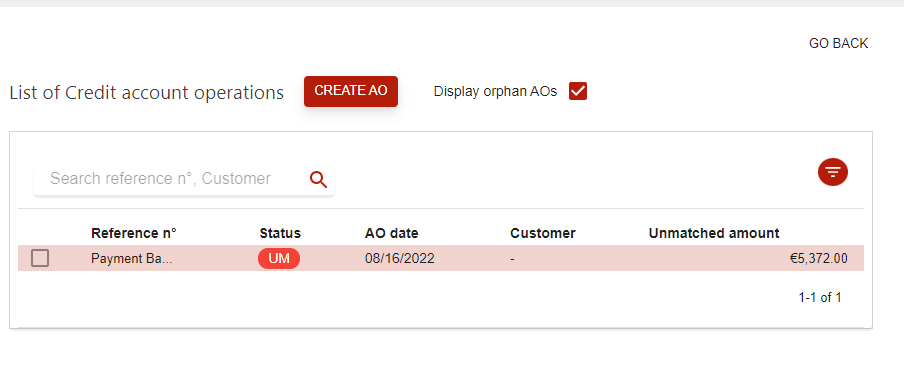
As you are able to create manually orphan AOs, you will also be able to link an orphan AO to a customer without having to match the AO. To do so, apply filter to display orphan AOs, and click on any of the AOs displayed. You will the see that the AO details are displayed in a pop up, and yo can only modify the Customer field. If you do link the orphan AO to a customer, then it will not be considered as orphan anymore, and the AO will be updated directly.
On the upper right hand side of the Credit AO, a checkbox is available and allows you to apply a filter to only display Orphan AOs. An Orphan AO si an AO that is not linked to any customer. As soon as you tick this box, this new filter will automatically be applied and you will then be able to use these AOs in your manual matching process.
At the bottom of our page, you will find the third and last table of this page. This table will display all the AOs selected in the first two ones, to allow you to have a clear view of the AOs you are going to match together, and this is why we have selection check boxes at the beginning of each AO line in both tables.

Now that we have seen all three tables, let’s now see how to use them 🥳 !
Manual matching process
When you arrive on the Manual matching page, you will see all unmatched Credit and Debit AOs, and in the third table at the bottom of the page, nothing (and it’s normal, you have to select AO before).
Opencell allows you to select either a Credit AO, or a Debit AO to start with. Say you only select AOs that are linked to customers, as soon as you select this first AO, in either Debit or Credit table, then:
-
This AO will be displayed in the third table, and will be considered the base line of your matching process.
-
The second table (in which you have not selected this base line AO) will be filtered to display only AOs linked to the same customer.
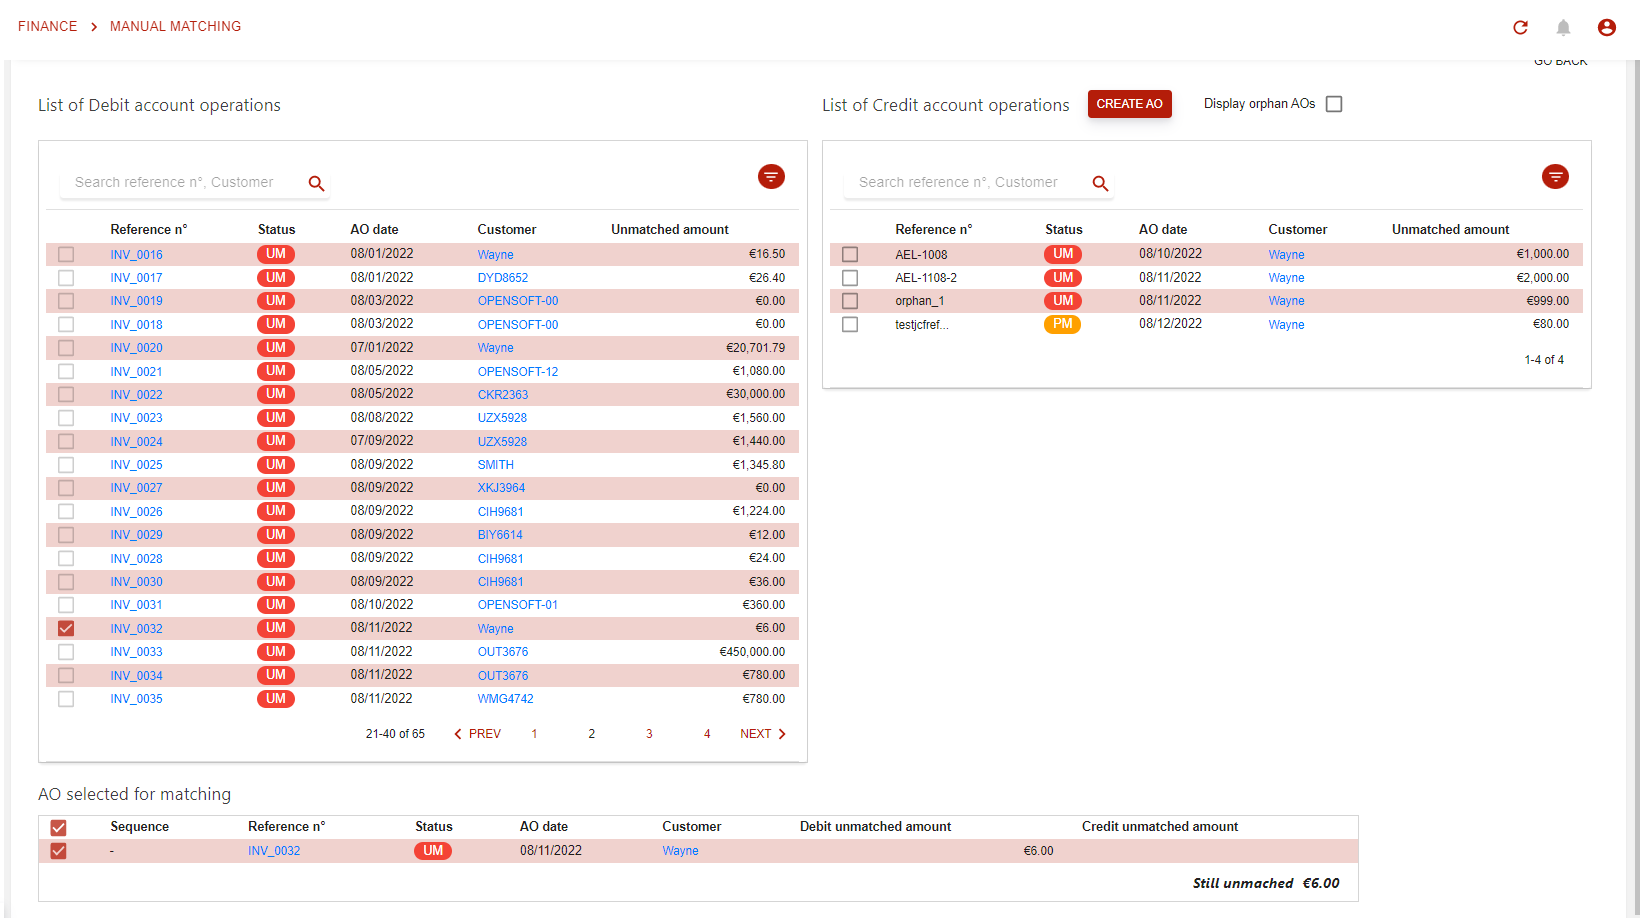
As you you can see up above, I have selected an AO from my Debit table. That AO was sent as base line to the third table (below) while the Credit table has been filtered to display only AOs from Wayne customer.
-
This logic also works if you start with a Credit AO as base line.
-
Orphan AOs do not activate any auto filters, and you can use them as base lines to your marching process as well.
The next step of my process is to select the counter part AO to match with. When I do so, three options and outcomes:
-
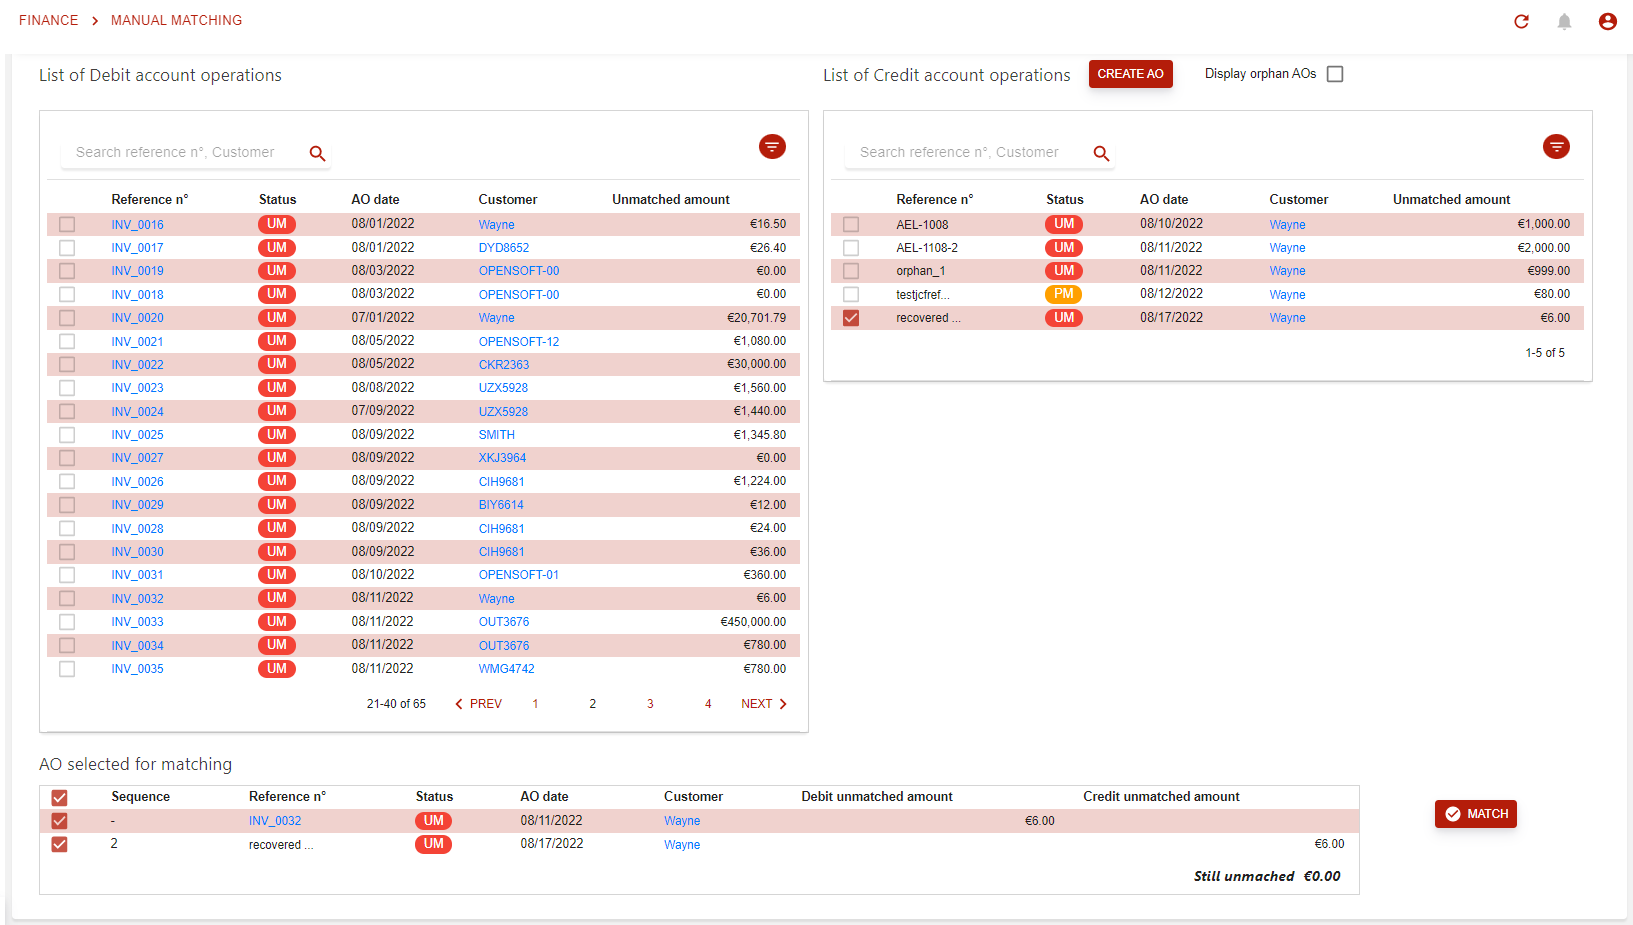
The counterpart AO has the exact same amount → You will be able to fully match ( A )
-
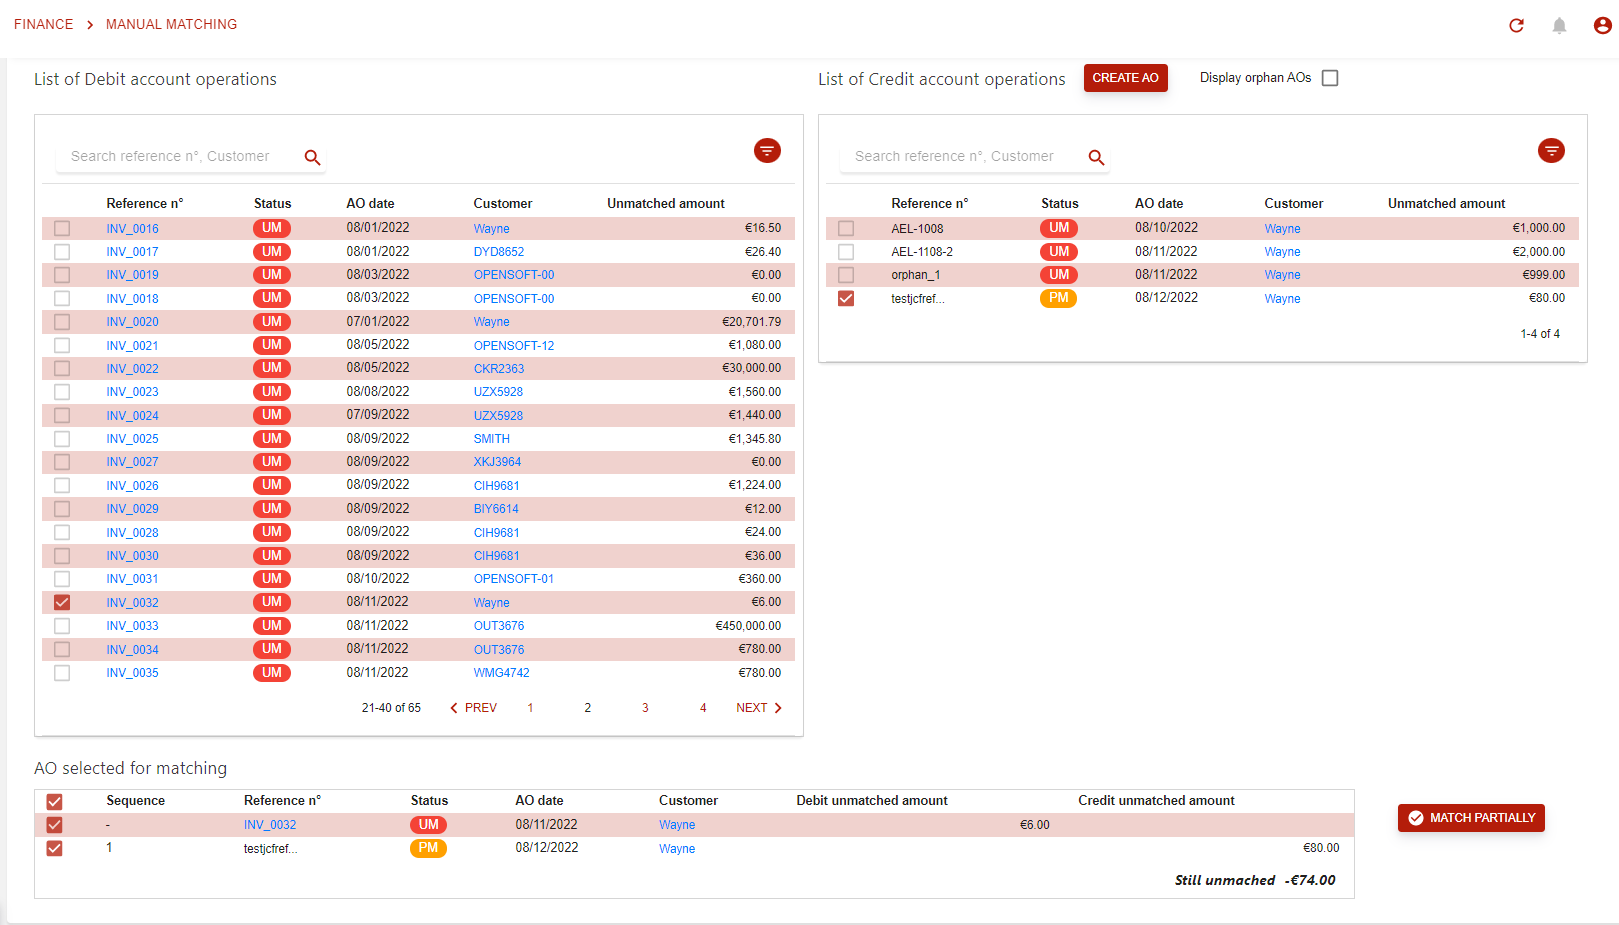
The counter part AO has a higher amount than the baseline AO → Partial match ( B )
-
The counter part AO has a lower amount than the baseline AO → Partial match (note that you can then select several counter part AOs). (C )
( A )
( B )
( C )
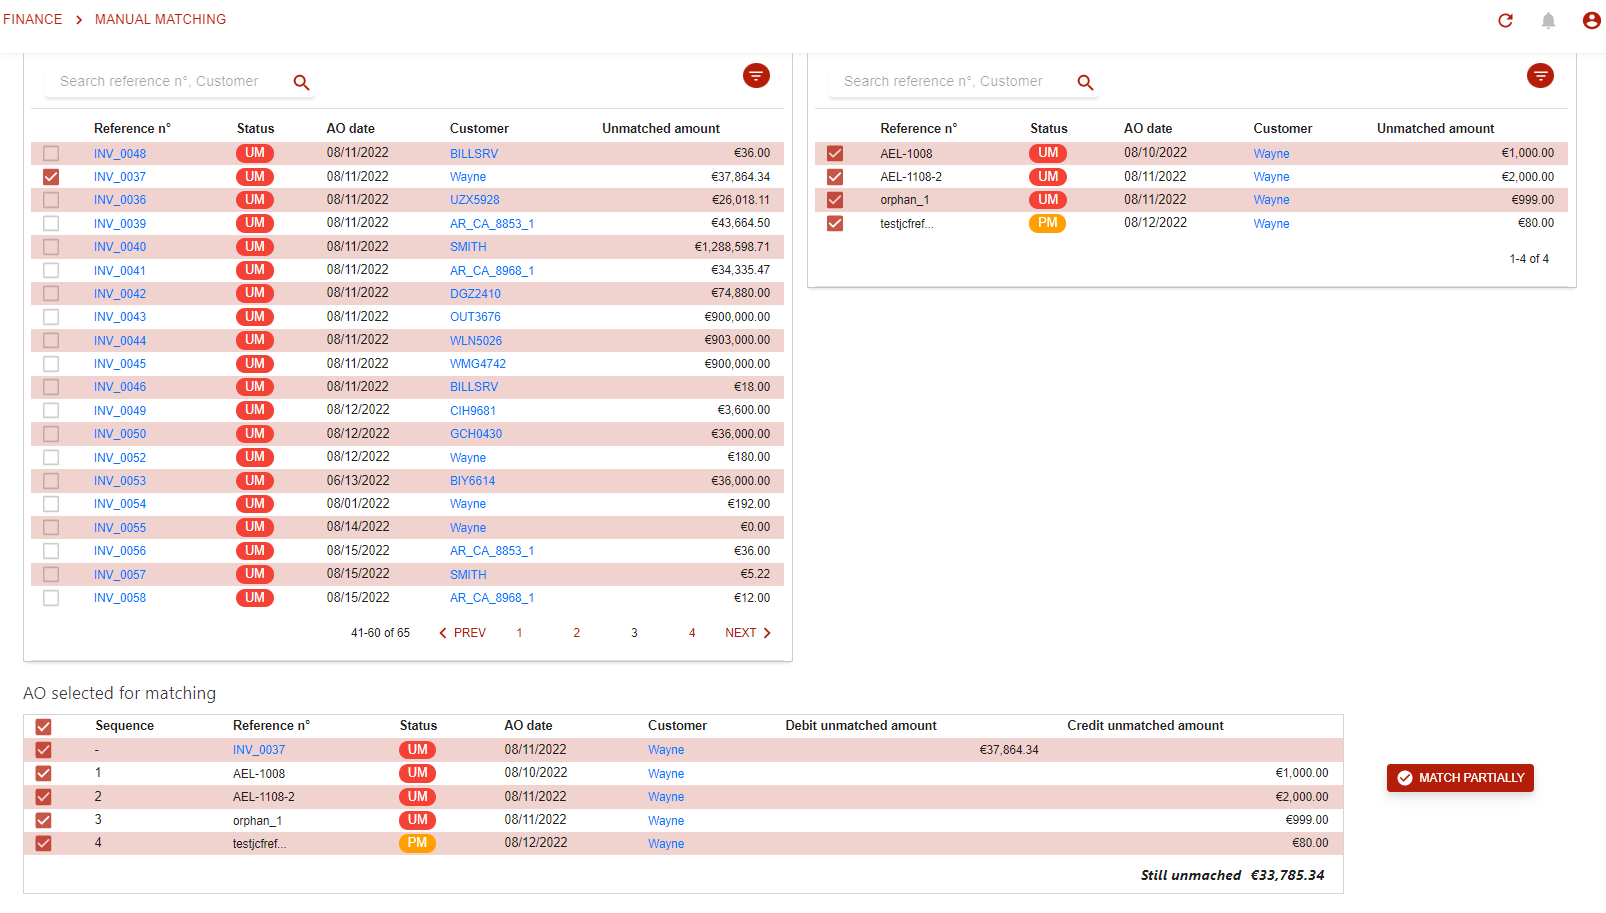
As soon as you have a complete match (A), then both AOs will then me larked as matched and not be displayed on this page.
For the two other cases (B and C), then part of the AOs will be marked as matched, and another part will be marked as Partially matched (PM status).
Unmatching AOs in Opencell
We have seen up above how to manually match AOs together from Opencell portal. but let’s say that for any reason, a mistake was made, now you would then need to un match these AOs.
This process can be done directly from the invoice pages. There you will now find a new section labeled “Payment history”. There you will be able to see all matched or partially matched payments.
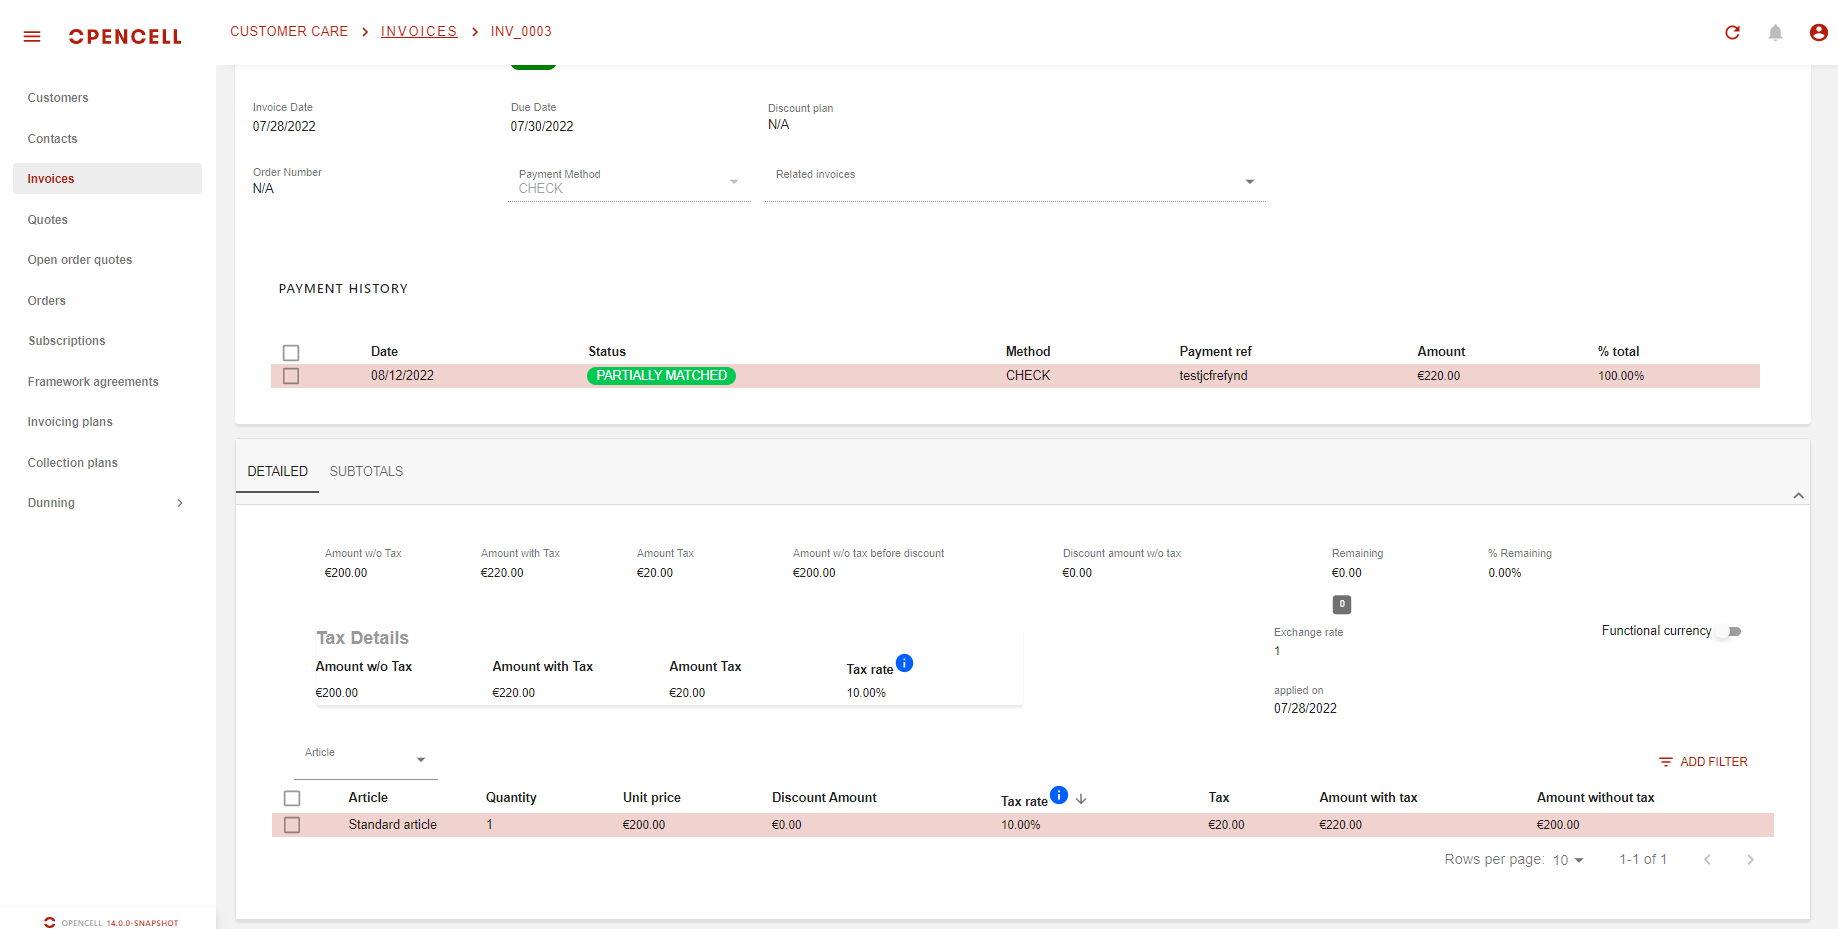
From there, you will only have to select one or several payment lines, and as soon as at least one is selected, a new button appears.
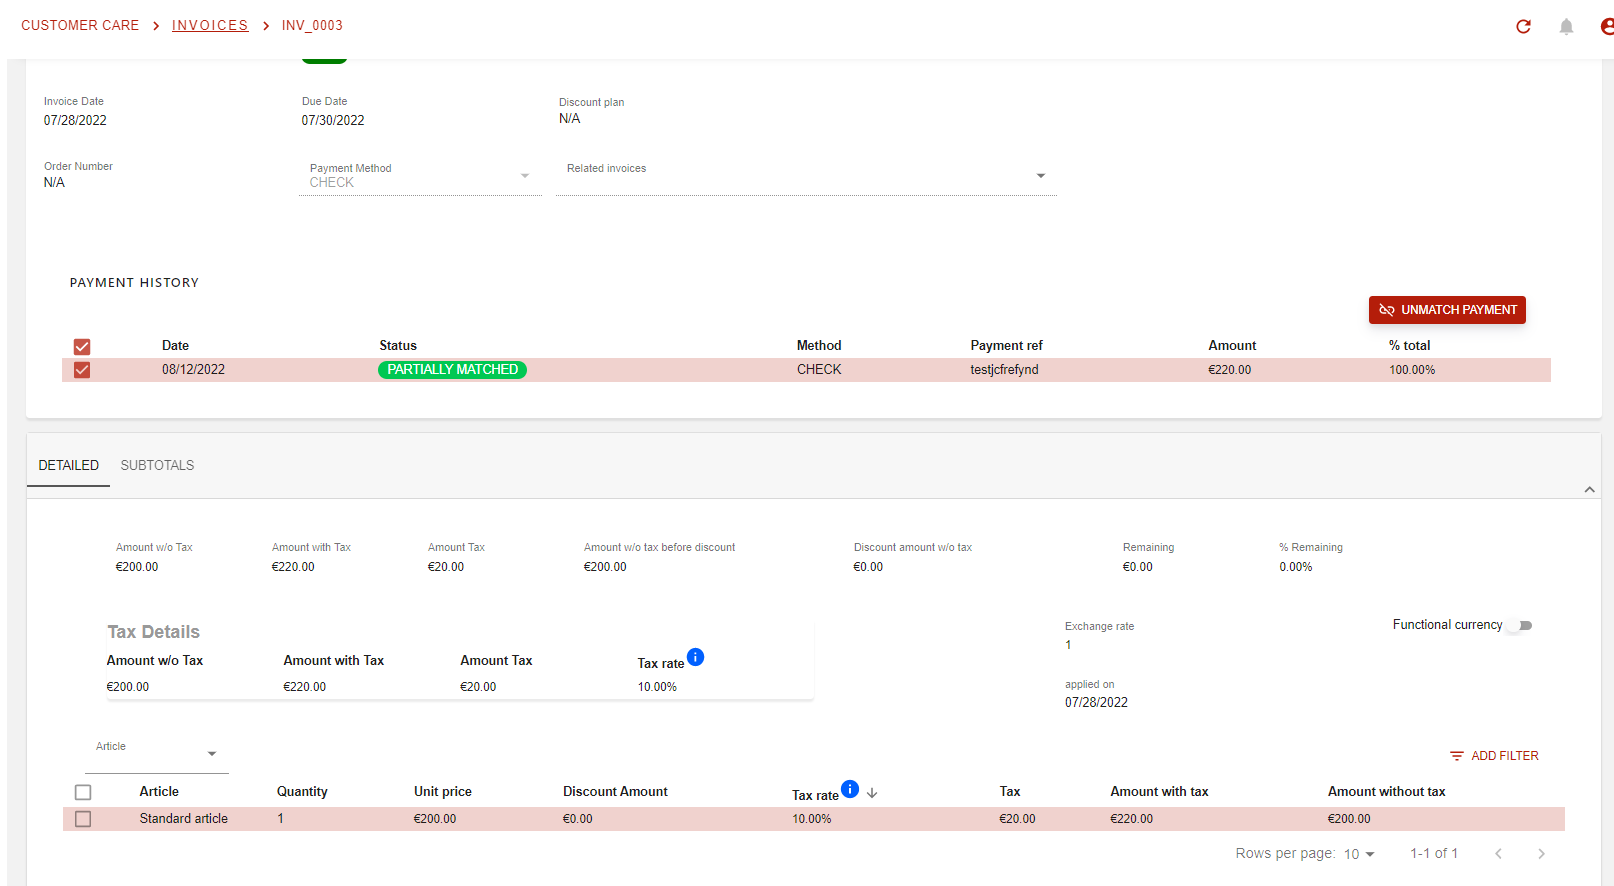
You can then un match the selected line(s). If you chose to do so, then linked AOs will be updated to reflect these modifications.
Transfer AOs in Opencell
This guide explains how users in the Opencell system can transfer an AO from one customer account to another. This is can be done by GUI in the manual matching page page within the OC system designed for manually matching AOs.
Common Scenario: A payment has been mistakenly assigned to the wrong customer account.
Conditions:
-
You can only transfer AOs that are:
-
In
matchingStatus == OPEN(unmatched) -
Not in
status != EXPORTED(not accounted for / not exported to accounting)
-
Transferring an Allocation Order (AO) - Step-by-Step Guide
-
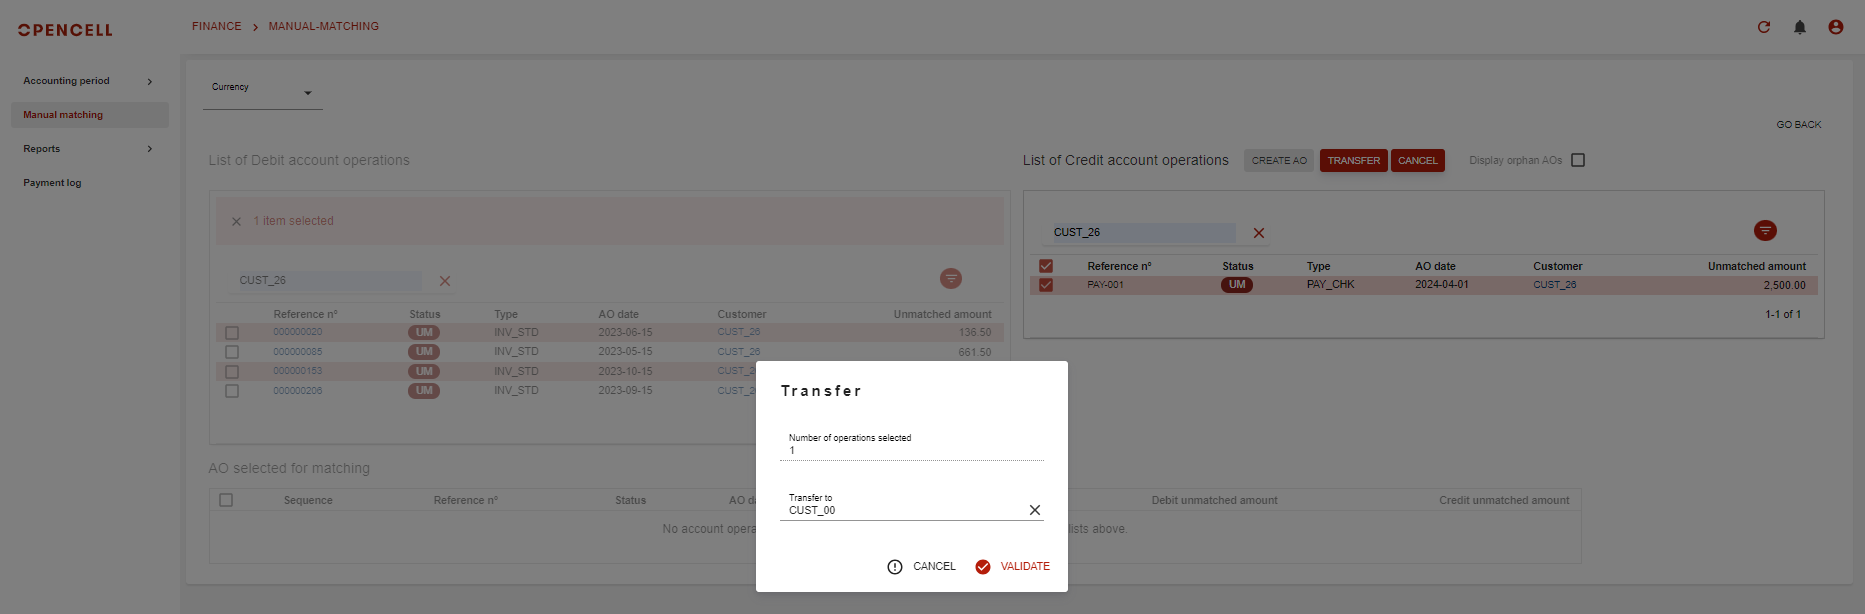
Initiating the Transfer:
-
Locate the "Transfer AO" button on the right side of the screen, typically near the "Create AO" button.
-
Clicking this button triggers several changes on the portal:
-
The "List of Debit account operations" table and the "AO selected for matching" table become grayed out (inaccessible).
-
The "Transfer AO" button changes its label to "Transfer"
-
A new "Cancel" button appears next to the "Transfer" button.
-
The "Create AO" and "Display orphan AOs" buttons become grayed out (inaccessible).
-
-
Selecting Credit Accounts:
-
A single checkbox appears at the top of the "List of credit account operations" table. Check this box to select all available credit accounts.
-
Alternatively, you can select individual AO lines (even if they belong to different customers) by clicking on their respective checkboxes.
-
Confirming the Transfer:
-
Clicking the "Transfer" button opens a confirmation pop-up window.
By following these steps, you can successfully transfer AOs between customer accounts in the OC system.
Manage operation litigation
-
Enter litigation
By selecting a single DEBIT operation, you will be able to mark this operation for litigation (button “Enter litigation”).
-
Update litigation
Selecting a single DEBIT operation already in litigation will allow you to update the litigation reason.
-
Remove litigation
Selecting a single DEBOIT operation already in litigation will allow you to remove it from litigation, and update the litigation reason.