As we have seen in previous units, Opencell’s Catalog Manager lets you configure your Products with Attributes and Charges. Attributes represent the characteristics of your Products and allow you to easily create variants of the same Product. Charges refer to the pricing structure of your Product.
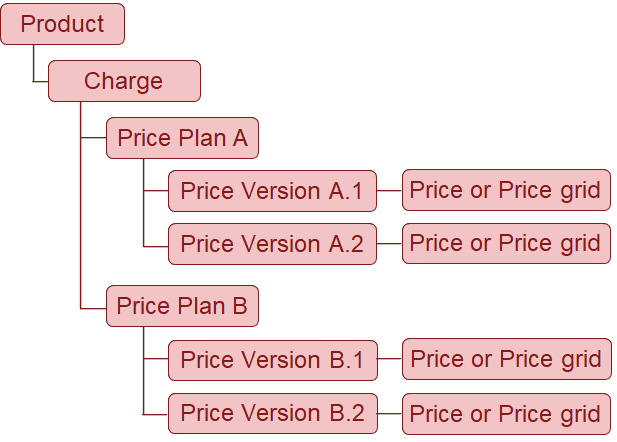
The next step is to define the prices associated to the pricing structure. Since prices usualu vary over time, they are organized into Price Versions. A series of Price Versions is part of a Price Plan. Since you may want to configure different prices for the same charge according to some criteria, Opencell allows you to have multiple price plans per charge with different application conditions.
Imagine that you sell the same subscription product to the B2B & B2C segments and you don’t want to create 2 separate Products in your catalogue. Let’s say the B2B segment has extra options that you configured using Attributes and lower tariffs. In this case, you would create 1 Product, 1 recurring Charge and your charge will have a Price Plan per segment. And since you change your tariffs every 6 months, each of the Price Plans will have a new Price Version every semester.
From Data model 2 (version 11 onward) of Opencell’s portal, the Price Plan concept is implicit, which means it is automatically generated when you create the first price version and all versions that follow will be related to the same Price Plan. It won’t be possible to create multiple Price Plans through the portal.
As previously described, some of My Demo Company’s product prices depend on a combination of Attributes, others have a single price with no specific options. Whenever a price is defined according to a combination of Attributes values, a Price Matrix is required.
Let’s go through how Ryan, the catalog administrator of My Demo Company would define the tarification of his products.
First let’s start with simple price charges that do not require a matrix.
Create a price version with a simple price
The User training Product has a cost per training day of 1050€ for 2021.
-
From the Catalog Manager’s Main Menu, select Products
-
Search for the Product Name: User Training 10
-
Click on it
-
Click on CHARGES tab
-
Click on CREATE
-
Select the Charge labeled: Cost Per Training Day 10
-
In the Price Versions Section, click on CREATE
-
Enter Label: 2021-Cost Per Training Day 10
-
Enter Start Date: 01/01/2021 and End Date: 31/12/2021
-
Save
-
Enter Price: 1050
-
Save
-
Click on PUBLISH VERSION
-
Go back
Notice that the Price Version created is related to the Price Plan with the code “PPM_CH0010”. PPM means Price Plan Matrix and it is followed by “_” and the Charge code to which the Price Plan and the correspondant Price version is related. The version number is automatically incremented each time you create a Price Version related to the same Price Plan.
The Licence for SMB Product costs 2000€ per month for 2021
-
From Catalog Manager’s Main Menu, select Products
-
Search for the Product Name: Licence SMB 30
-
Click on it
-
Click on CHARGES tab
-
Click on CREATE
-
Select the Charge labeled: Licence SMB Subscription 30
-
In the Price Versions Section, click on CREATE
-
Enter Label: 2021- LicenceSMB 30 Subscription
-
Enter Start Date: 01/01/2021 and End Date: 31/12/2021
-
Save
-
Enter Price: 2000
-
Save
-
Click on PUBLISH VERSION
-
Go back
The Consulting Services Product has a cost per consulting day of 850 €.
-
From Catalog Manager’s Main Menu, select Products
-
Search for the Product Name: Consulting Services 40
-
Click on it
-
Click on CHARGES tab
-
Click on CREATE
-
Select the Charge labeled: Cost Per Consulting Day 50
-
In the Price Versions Section, click on CREATE
-
Enter Label: 2021-Cost Per Consulting Day 50
-
Enter Start Date: 01/01/2021 and End Date: 31/12/2021
-
Save
-
Enter Price: 850
-
Save
-
Click on PUBLISH VERSION
-
Go back
Create a price version with a price grid
When your product is subject to multiple configurations according to the values of its Attributes, most probably its price will vary. Each combination of Attributes values could result in a different price. To manage this complex pricing structure, Opencell allows to create a price grid.
A Price Grid is a matrix whose dimensions are related to the product’s attributes and constitute the columns of the matrix. The lines of the matrix are defined by the combination of the values that have been given to each attribute. The result of each line of the matrix is a price value.
The Post delivery support Product has one shot Charge related to the Operation KPI Dashboard. Its price depends on the dashboard type which can be either basic or advanced. Therefore, the Operation KPI Dashboard 20 charge has a 1 dimension Price Grid based on the attribute Operation KPI Dashboard Type 50.
-
From Catalog Manager’s Main Menu, select Products
-
Search for the Product Name: Post delivery support 50
-
Click on it
-
Click on CHARGES tab
-
Click on CREATE
-
Select the Charge labeled: Operation KPI Dashboard 20
-
In the Price Versions Section, click on CREATE
-
Enter Label: 2021-Support Subscription 40
-
Enter Start Date: 01/01/2021 and End Date: 31/12/2021
-
Set the Price Grid toggle to TRUE
-
Save
-
Click on EDIT COLUMNS
-
Click on ADD
-
Enter in the Dimension field: KPI Dashboard Type
-
Select the Attribute: Operation KPI Dashboard Type 50
-
Save
-
Double click in the first line of the column with header KPI Dashboard Type and select: Basic
-
Double click in the first line of the column with header Unit Price and enter: 5000
-
Double click in the second line of the column with header KPI Dashboard Type and select: Advanced
-
Double click in the second line of the column with header Unit Price and enter: 10000
-
Save
-
Click on Publish Version
-
Go back 1
-
Go back 2
Price grid priorities and matching
The Post delivery support Product has a monthly subscription which price depends on 2 Attributes: Number of dedicated people 30 and Support communication channels 40.
Repeat the steps above for the Support Subscription 40 Charge and create a 2 dimensions Price Grid using the attributes Number of dedicated people 30 and Support communication channels 40 as defined in the table below. Since the Support communication channels 40 is a “Multiple list of values” type Attribute, whenever you have a line with more than one value, double click in the cell to select the first value and double click again for the the following values. You will notice that the value you’ve already selected is no longer in the list.
|
Number of dedicated people |
Communication channels |
Monthly subscription (EUR) |
|---|---|---|
|
1 |
Jira ticketing |
3000 |
|
1 |
Jira ticketing, hotline |
4000 |
|
2 |
Jira ticketing, hotline |
6000 |
|
2 |
Jira ticketing, hotline, live chat |
6500 |
|
2 |
Jira ticketing, hotline, live chat, live assistance |
7000 |
|
2 |
|
8000 |
|
3 |
|
10000 |
When you have multiple Attributes in the grid and each Attribute can have various values, mapping all combinations quickly becomes a very tedious act, especially when some combinations lead to the same price. This is why the Price Grid includes matching rules and priorities.
Let’s take the following Price Grid mapping example where:
“Attribute 1” can take the following values: A, B, C, D
“Attribute 2” can take the following values: 1, 2, 3, 4
“Attribute 3” can take the following values: a,b,c,d
|
Gridline |
Attribute 1 |
Attribute 2 |
Attribute 3 |
|---|---|---|---|
|
L1 |
A |
1 |
a |
|
L2 |
A |
1 |
|
|
L3 |
A |
2 |
b |
|
L4 |
A |
2 |
a |
|
L5 |
B |
1 |
c |
During the quoting process the sales rep should make a choice as follows:
(Attribute 1, Attribute 2, Attribute 3)
Let’s see what happens in each of the following cases:
Case 1
(B,1,c)
|
Attribute 1 |
Attribute 2 |
Attribute 3 |
Priority |
|---|---|---|---|
|
FALSE |
TRUE |
FALSE |
FALSE |
|
FALSE |
TRUE |
TRUE* |
FALSE |
|
FALSE |
FALSE |
FALSE |
FALSE |
|
FALSE |
FALSE |
FALSE |
FALSE |
|
TRUE |
TRUE |
TRUE |
TRUE |
L5 is an exact match.
Case 2
(A,1,a)
|
Attribute 1 |
Attribute 2 |
Attribute 3 |
Result |
|---|---|---|---|
|
TRUE |
TRUE |
TRUE |
TRUE |
|
TRUE |
TRUE |
TRUE* |
TRUE* |
|
TRUE |
FALSE |
FALSE |
FALSE |
|
TRUE |
FALSE |
TRUE |
FALSE |
|
FALSE |
TRUE |
FALSE |
FALSE |
L1 is the best match. An exact match has a higher priority than a match with NULL value like L2. A cell with no value means any value can match.
Case 3
(A,1,c)
|
Attribute 1 |
Attribute 2 |
Attribute 3 |
Priority |
|---|---|---|---|
|
TRUE |
TRUE |
FALSE |
FALSE |
|
TRUE |
TRUE |
TRUE* |
TRUE* |
|
TRUE |
FALSE |
FALSE |
FALSE |
|
TRUE |
FALSE |
FALSE |
FALSE |
|
FALSE |
TRUE |
TRUE |
FALSE |
L2 is the best match. No line has an exact match, L2 matches with a NULL value. A cell with no value means any value can match.
Case 4
(A,2,d)
|
Attribute 1 |
Attribute 2 |
Attribute 3 |
Priority |
|---|---|---|---|
|
TRUE |
FALSE |
FALSE |
FALSE |
|
TRUE |
FALSE |
TRUE* |
FALSE |
|
TRUE |
TRUE |
FALSE |
FALSE |
|
TRUE |
TRUE |
FALSE |
FALSE |
|
FALSE |
FALSE |
FALSE |
FALSE |
No match. Quote will have an empty price. Commercial rules would be necessary to avoid unavailable combination.
Block pricing
For the Consulting Services Product, we’ve seen that the subscription to priority pass depends on the number of consulting days. For consulting days up to 200, the price is 5 000,00€/month, for consulting days up to 500, the price is 7 000,00 €/month. Now imagine that your customer wants 300 days.
With block pricing, the subscription for 300 days would be 7 000,00€ as 300 is between 200 and 500.
To use block pricing, we need to define the sizes of our “tiers” . A tier typically describes three important pieces of information.
-
Lower Bound: The lowest quantity that a given tier supports. It would be 1.
-
Upper Bound: The first quantity that the tier doesn’t support. So, the upper bound for the up to 200 tier is actually 201. The upper tier is 201 because the up to 500 uses 201 as the lower bound.
Important: It’s best practice to make the upper bound of a tier the same as the lower bound of the next tier. -
Price: the price applied to any value between lower and upper bound of the tier
Tiers would be useful for attributes of type date or numeric value or integer.
Let’s create the price grid of the Priority Pass Subscription 60 Charge which depends on the Consulting Days 10 Attribute.
-
From Catalog Manager’s Main Menu, select Products
-
Search for the Product Name: Consulting Services 40
-
Click on it
-
Click on CHARGES tab
-
Click on CREATE
-
Select the Charge labeled: Priority Pass Subscription 60
-
In the Price Versions Section, click on CREATE
-
Enter Label: 2021-Priority Pass Subscription 60
-
Enter Start Date: 01/01/2021 and End Date: 31/12/2021
-
Set the Price Grid toggle to TRUE
-
Save
-
Click on EDIT COLUMNS
-
Click on ADD
-
Enter in the Dimension field: Consulting days
-
Select the Attribute: Consulting Days 10
-
Set the Range toggle to TRUE
-
Save
-
Double click in the first line of the column with header Consulting days and enter: 1-201
-
Double click in the first line of the column with header Unit Price and enter: 5000
-
Double click in the second line of the column with header Consulting days and and enter: 201-501
-
Double click in the second line of the column with header Unit Price and enter: 10000
-
Double click in the third line of the column with header Consulting days and enter: 501-10001
-
Save
-
Click on Publish Version
-
Go back 1
-
Go back 2
Product Activation
When you first create your product, it is created in a DRAFT status. Once you’ve finished adding all the information relative to your product, you can activate it by clicking on the Activate button.
To activate a Product, you should have at least one activated Product Version. To activate a Product Version, click on the Activate button in the Product Version section. An activated Product Version has a PUBLISHED status.
Once your product is activated (status Activated ) you are only allowed to add new product versions or price versions to the charges related to your product
Make sure to add the related Discounts to your Offer before activation.
Once the Offer is activated, no changes are allowed.
Product Duplication
You can duplicate your product by clicking on the “DUPLICATE” button in the targeted product page.
The resulting product inherits the same charges and attributes as the original product and any other filled information. It has the same Product Code as the original Product with a ”-copy” extension that you can modify. As for the media, it is also duplicated.
… / …