
From 18.1.0 onwards, you can create a subscription in the new portal from a single page, Create a new subscription. You fill in the general information, the terms of the subscription and its products, then save.
You can open this page in two ways:
-
From the Subscriptions list, with the Create subscription button. Nothing is pre-filled from a billing account: you start by selecting the billing account.
-
From a billing account, either with the Create subscription button of the Subscriptions section on the billing account page, or from the actions menu of a line in the billing account list. The Billing account and Seller fields are then pre-filled for you. From the billing account page, the Consumer field is pre-filled too when the billing account has only one consumer that can subscribe; otherwise you choose it.
Fields marked with an asterisk (*) are mandatory.
Step 1 — Fill in general information
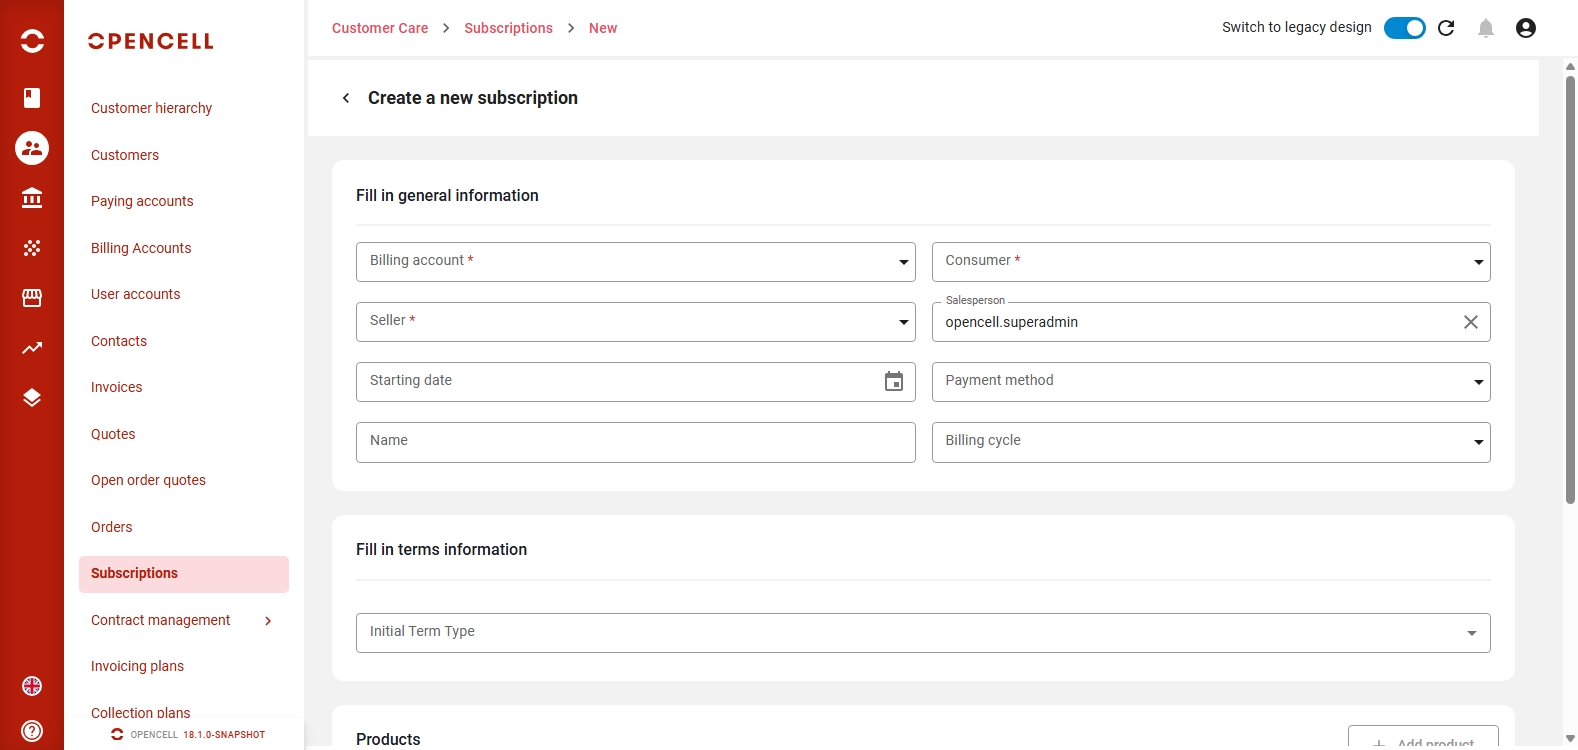
In the Fill in general information section, fill in the following fields:
|
Field |
Mandatory |
What you do |
|---|---|---|
|
Billing account |
Yes |
Click the field and select the customer's billing account. The Seller field is then filled in with the seller of the billing account's customer and, if the billing account has only one user account, the Consumer field too. |
|
Consumer |
Yes |
Click the field and select the consumer among the user accounts of the selected billing account that can be consumers. |
|
Seller |
Yes |
Filled in when you select the billing account. You can select another seller from the list. |
|
Salesperson |
No |
Filled in with your own user name by default. You can change it. |
|
Starting date |
No |
Pick the date in the calendar. |
|
Payment method |
No |
Empty by default. Select one of the active payment methods of the customer's paying account. Each method is shown with its alias and its type. |
|
Name |
No |
Enter a name for the subscription. |
|
Billing cycle |
No |
Select the billing cycle from the list. |
Step 2 — Fill in terms information
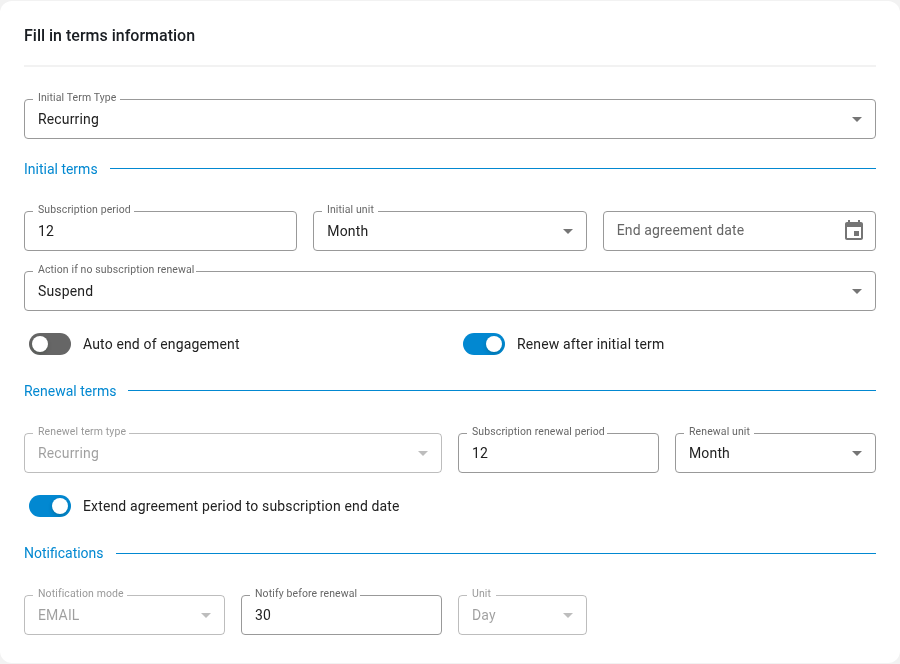
In the Fill in terms information section, select the Initial Term Type. The fields displayed under Initial terms depend on your choice:
-
Fixed: End of initial term and End agreement date.
-
Calendar: Calendar, where you select a calendar, and End agreement date.
-
Recurring: Subscription period, Initial unit (Day or Month) and End agreement date.
Whatever the term type, you also find:
-
Action if no subscription renewal: select Suspend or Terminate. If you select Terminate, a mandatory Termination reason field appears: select the reason from the list.
-
Auto end of engagement: when you switch it on, the End agreement date field is hidden.
-
Renew after initial term: switch it on to define how the subscription is renewed (see below).
Renewal terms
When Renew after initial term is on, a Renewal terms part appears:
-
Renewal term type: always Recurring in the new portal; the field cannot be changed. Set the Subscription renewal period and the Renewal unit (Day or Month).
-
Extend agreement period to subscription end date: switch it on to renew the subscription until its planned end.
Under Notifications, you define the reminder sent before the renewal:
-
Notification mode: Email is the only mode available.
-
Notify before renewal: how many days before the renewal the notification is sent. Its Unit is always Day.
Step 3 — Select the offer and its products
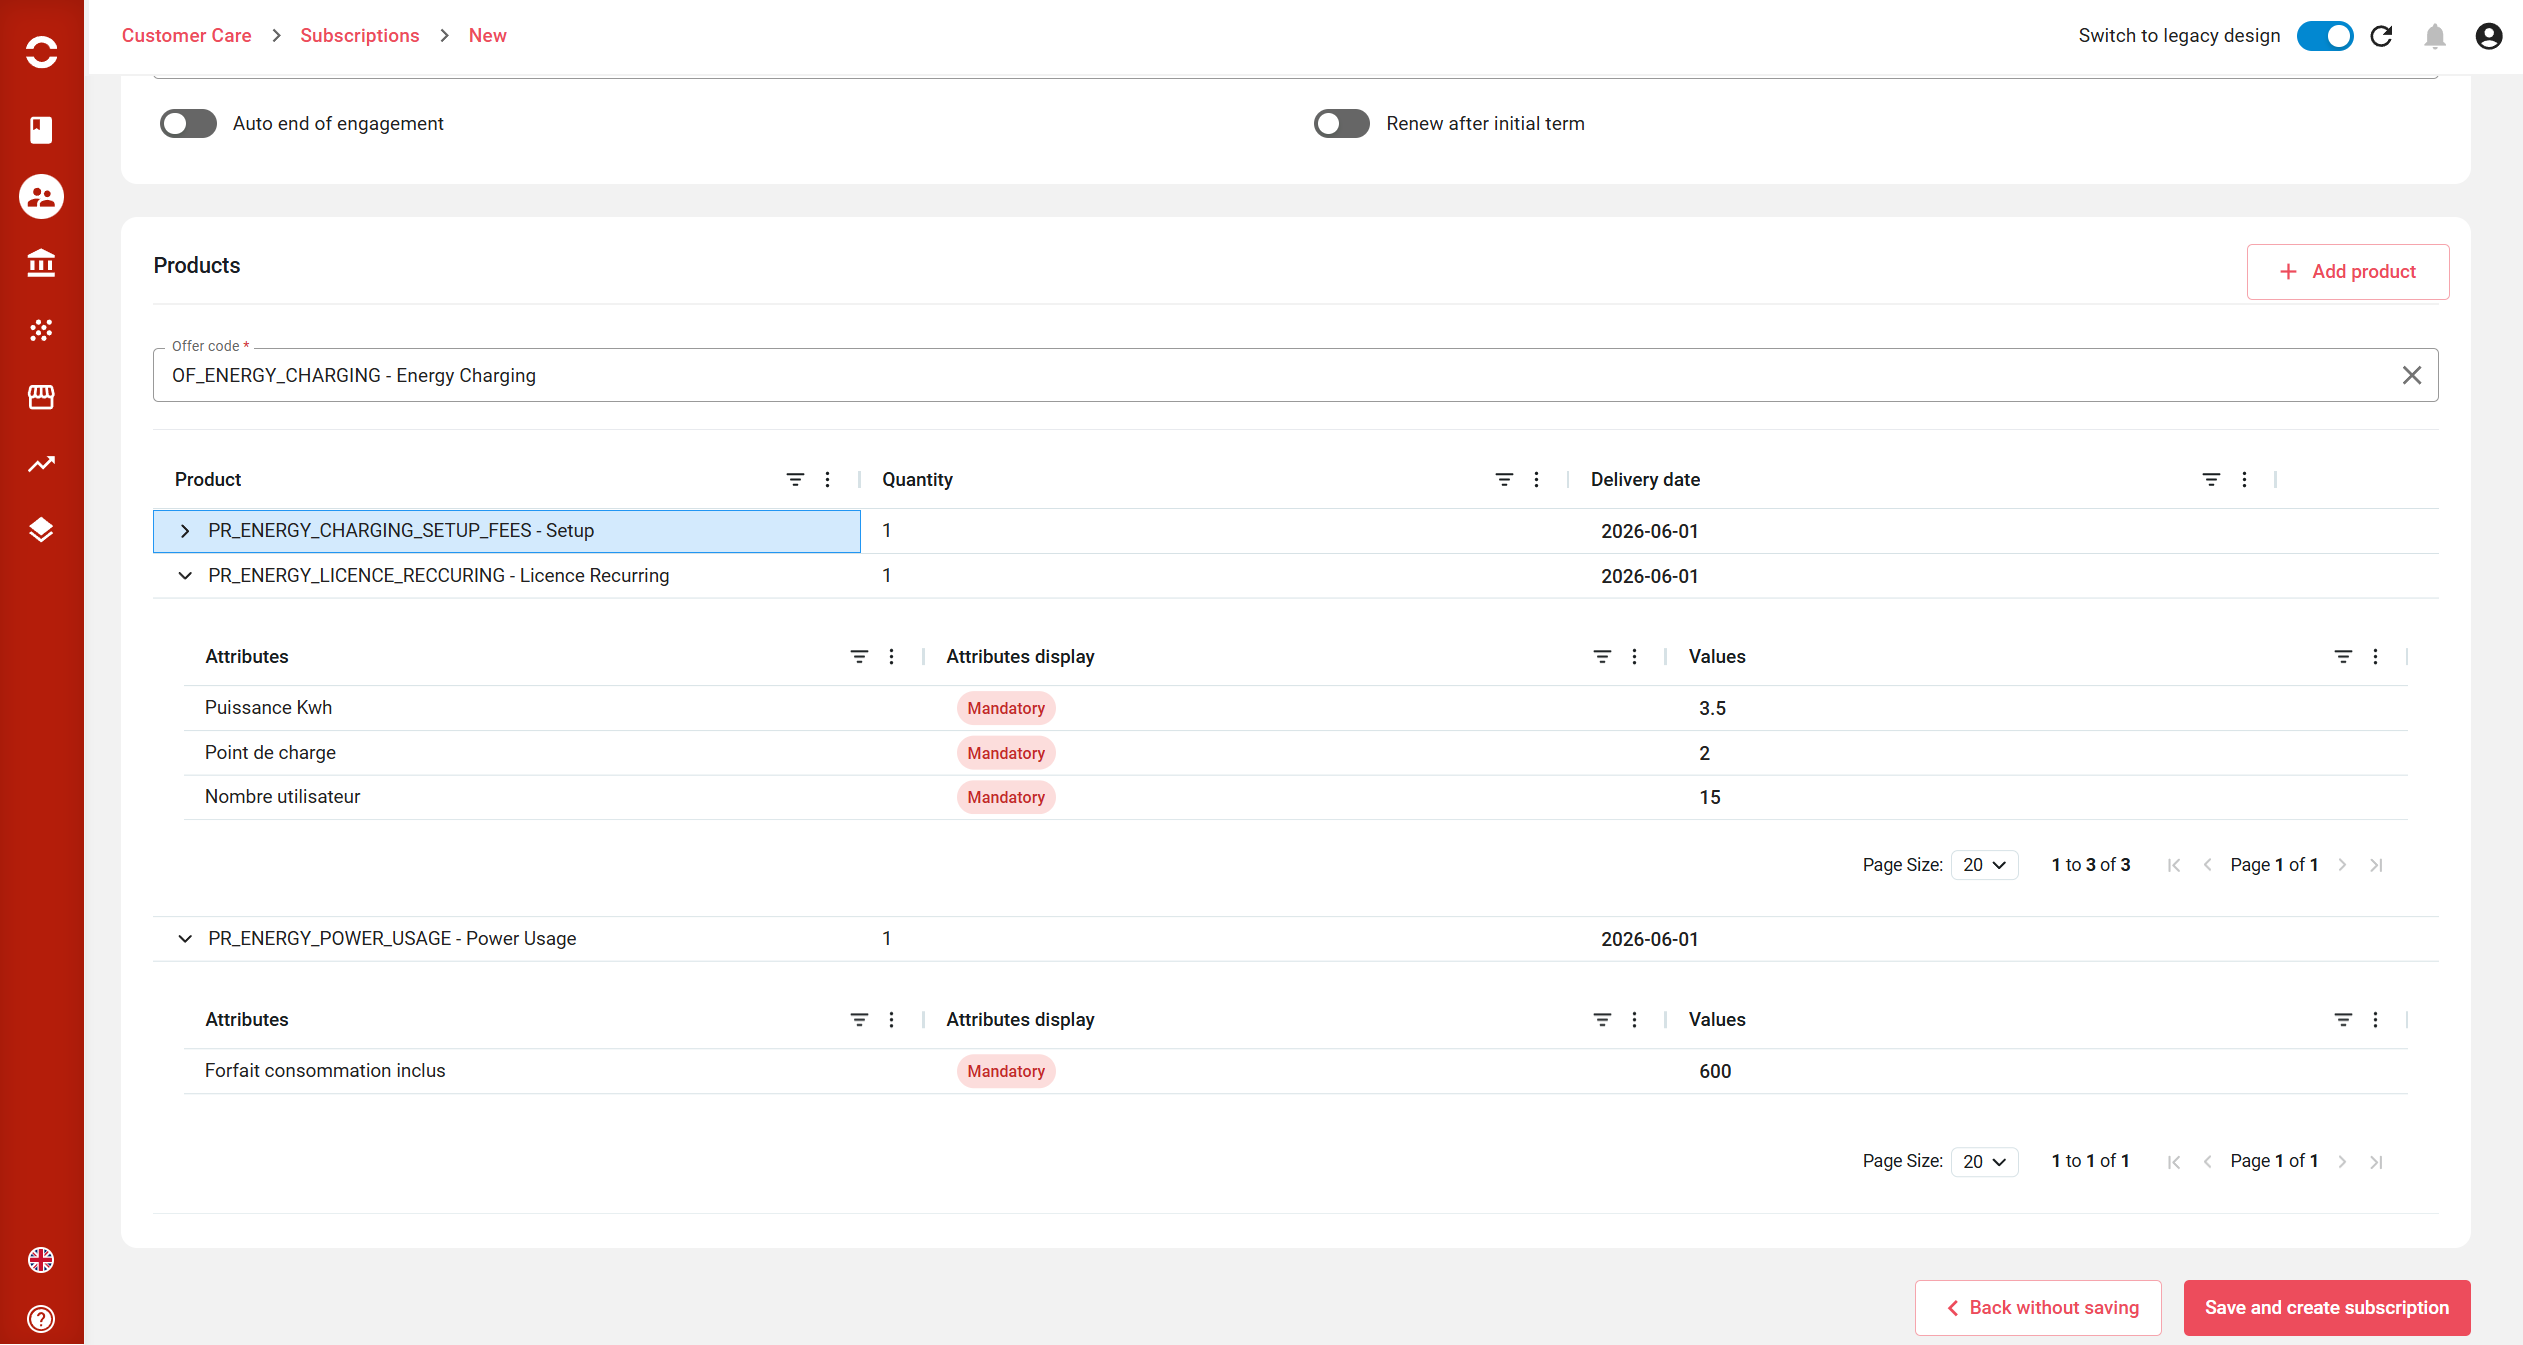
In the Products section:
-
Select the offer in the Offer code field. The Add product button stays disabled until an offer is selected.
-
The mandatory products of the offer are added automatically, in the order defined in the catalog. You cannot remove them.
-
To add more products, click Add product and select them in the window that opens. You can add the same product more than once.
-
For each product line, check the Quantity and the Delivery date. You can remove a product you added yourself.
Product attributes
When a product has attributes, an arrow (>) appears at the start of its line. Click it to show or hide the attributes in a grid under the product. Only the attributes set as visible in the catalog are shown, in the order defined for the product.
For each attribute, the grid shows:
-
Attributes: the attribute name.
-
Attributes display: whether the attribute is Mandatory or Optional.
-
Values: the value of the attribute. If the attribute has a default value, it is already filled in.
Enter the values directly in the grid. For a list attribute, select the value from the drop-down list. Read-only attributes cannot be changed. Optional attributes can stay empty, but every mandatory attribute must have a value before you can save.
Step 4 — Save the subscription
At the bottom of the page:
-
Save and create subscription creates the subscription. If a mandatory field or a mandatory attribute is empty, the subscription is not saved: fill it in and click the button again. Once the subscription is created, the message “Subscription created.” is displayed and you are taken to the subscription details page.
-
Back without saving takes you back to the page you came from, without creating anything.
To manage the products and attributes of an existing subscription, see Subscription products & attributes.